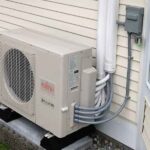
How to install mini split systems comes down to three work bands with different rules. The physical part, mounting the indoor head, drilling the line-set hole, setting the condenser, and routing the lines, is well within a careful homeowner’s reach. The electrical connection and the refrigerant work are where the rules change: most jurisdictions want a permit for the circuit, and federal law requires an EPA-certified technician to handle the refrigerant charge.
A mini split is a ductless system: an indoor air handler and an outdoor condenser connected by a refrigerant line set that runs through a small wall opening. Mini splits earn their reputation in homes without ductwork. Older houses, room additions, garages, and finished attics are the classic fits.
A single-zone kit for one room is the realistic DIY scale. A multi-zone system with a long line set is where the savings shrink and the failure odds climb.
What To Sort Out Before You Buy a Mini Split
Before you buy, settle three things: the BTU rating for the room, the voltage your wall can support, and whether your town requires a permit. Sizing mistakes are the most common regret, because a unit that is too large short-cycles and one that is too small runs nonstop.
Match the BTU to the Room
A 12,000 BTU unit typically covers 400 to 550 square feet. That number moves with insulation, window area, and climate.
A south-facing room with single-pane windows needs more capacity than the same square footage in a shaded, well-insulated room.
Rule of thumb: figure about 20 BTU per square foot for a normally insulated room, then add margin for sun exposure. A professional load calculation (Manual J) is the accurate path, and it is worth the money before you commit to a multi-zone layout.
Voltage and the Electrical Circuit
Most units above 9,000 BTU want a dedicated 208-230V circuit with its own breaker and a disconnect at the outdoor unit. Small units around 9,000 BTU or less are sold in 110V versions that plug into an existing outlet, which keeps the electrical work simple.
For the same cooling load, a 220V unit draws roughly half the current of a 110V unit, so the wire can be lighter and the motor runs more efficiently. Check the nameplate before you plan the circuit, and confirm what your service panel has room for.
Ensuring electrical compatibility is a critical step when adding heavy appliances or new heating and cooling units. Regional HVAC specialists, such as Performance Heat and Air of Mansfield, often emphasize evaluating overall power load and panel capacity early in the planning stage to prevent electrical issues and ensure the system operates reliably.
Electrical upgrades often require professional verification to ensure that added voltage load matches the existing main board safely. Homeowners evaluating their home heating and cooling infrastructure can click here to review professional standard practices and system requirements before adding high-draw circuits.
Permits and Local Rules
Many municipalities require a permit for the electrical work, and some for the refrigerant work too. The building department, not the internet, is the authority on your local rules, so call or check their site before you buy the kit. Homeowner associations can add their own restrictions on where an outdoor condenser may sit.
If your town posts guidance for retrofit projects, the permit and inspection steps usually live in the same place as the Home Improvement guides on this site, which cover common upgrade projects from permit to final inspection.
Tools and Materials Checklist
Expect about $500 to $1,000 in tools if you start from nothing, and most of that sits in the vacuum pump and manifold gauges. A precharged DIY kit removes the pump requirement, but the checklist below covers a conventional install.
| Tool or material | What it does | Typical cost |
|---|---|---|
| Torpedo level and stud finder | Mount the indoor bracket level on solid framing | $35-90 |
| Hammer drill with 2-3 in. hole saw | Cut the line-set hole through the wall | $60-150 |
| Tube cutter and flaring tool | Cut and flare the line set to spec | $40-120 |
| Torque wrench | Tighten flare nuts to the manual’s value | $30-80 |
| Vacuum pump and manifold gauges | Evacuate moisture and air from the lines | $150-350 |
| Condenser pad or wall bracket | Support the outdoor unit off the ground | $40-200 |
| Wire strippers and voltage tester | Terminate the circuit and confirm it is dead before work | $30-100 |
| Line-set insulation and sealant | Keep the suction line insulated end to end | $20-60 |
A single-zone install is a full-day job for a first-timer, closer to two weekends if you work in spare hours. If you are planning the timing, how long does air conditioning installation take breaks down the hours by system type, including ductless work.
How to Install Mini Split Systems Step by Step
The workflow is: mount the indoor head, drill and route the line set, set the condenser, connect lines and wiring, evacuate the lines, then open the valves and test. Each step below ends with a checkpoint you can verify before moving on.
Step 1: Mount the Indoor Unit
Choose a spot on an exterior wall with clearance all around: at least 6 inches below the ceiling, a few inches on each side, and nothing blocking the supply path. Avoid direct sun, heat sources, and shelves that will crowd the airflow.
Attach the mounting plate with the bubble level centered. The plate must be genuinely level in both directions, because the condensate pan relies on gravity to drain, and a tilt of a few degrees will pool water by the third month.
Checkpoint: the plate reads level in both axes and every fastener lands in a stud or solid anchor.
Step 2: Drill the Line-Set Hole and Route the Lines
Drill a 2 to 3 inch hole slightly tilted toward the outside, about a quarter inch of fall over the wall thickness, so rain cannot run inward.
Use a core bit or hole saw with a dust bag, because the wall cavity will be open during the rest of the install.
Slide a plastic sleeve through the hole and route the bundled line set, wiring, and drain hose through it. Pull the lines in a gentle sweep; sharp bends kink the copper and kill the unit’s efficiency permanently.
Checkpoint: the sleeve seats fully, the hole tilts outward, and no line has a bend tighter than the manual’s minimum radius.
Step 3: Set the Outdoor Condenser
Place the condenser on a pad or wall bracket, level, and with the clearances from the manual, usually 6 to 12 inches off the wall and open space on the coil side. An 80 to 100 pound unit is heavy enough to throw out a back, so bring a second person for the lift.
Keep the line set as short and straight as the layout allows. Every extra foot of line adds refrigerant charge requirements and energy loss, and a run longer than the manual’s limit voids the warranty. If the condenser faces a snowy winter, the fall hvac maintenance tips cover the coil and clearance checks worth doing before the first storm.
Checkpoint: the condenser sits level, the pad is stable, and the clearance matches the manual on every side.
Step 4: Connect Lines, Wiring, and Condensate
A flare connection is the brass union that joins a copper line to the unit’s service valve, and it is the make-or-break step of a mini split install. Cut the copper square, deburr the inside edge, and flare it with the correct die before tightening each nut to the torque in the manual, not to feel.
An overtightened flare deforms and leaks; an undertightened one leaks immediately.
Slide insulation over the full suction line before connecting, seal every joint, and run the condensate hose with a continuous downward slope. A sag in the middle of the drain is a wall-damage claim waiting to happen.
Checkpoint: every flare is torqued to spec, the insulation has no exposed sections, and the drain falls continuously from indoor unit to exit.
Step 5: Vacuum, Leak-Check, and Open the Valves
Connect the vacuum pump and manifold gauges to the service ports and pull the lines down to below 500 microns, or the value in your manual, then hold it for at least 30 minutes. This step removes moisture and air; skipping it is the second most common cause of early failures.
Once the vacuum holds, close the pump valve and watch the gauge for a stable reading, then open the liquid and gas valves to release the factory charge. If your kit is not precharged and requires handling loose refrigerant, stop here and call a technician, because that work needs an EPA Section 608 certification.
Checkpoint: the micron gauge holds steady, both service valves are fully open, and the caps are back on.
Step 6: Power On and Run the Acceptance Tests
Restore power, start the unit on cooling, and let it run for 15 minutes before judging anything. Measure the temperature difference between the return air and the supply air; a cooling delta of 15 to 20 degrees Fahrenheit is the usual healthy range, with the exact value in the manual.
Watch the condensate drain drip steadily, listen for rattles or hissing, and check that the breaker does not trip under load.
Checkpoint: delta-T sits in the healthy range, water flows from the drain, and the outdoor fan cycles smoothly.
Where Mini Split Installations Usually Fail
Four failures cause most of the callbacks: leaking flare connections, a vacuum that was cut short, drain lines without slope, and undersized circuits. All four show up in the first weeks, and all four are preventable with a checkpoint at the step.
“Leaking flares are the most common issue, and not vacuuming the lines enough. One of the DIY-focused brands like MrCool with charged lines and not-flare connecting would eliminate those challenges. Physically mounting the unit and running the lines is easy unless you are wanting to run through closets or are way high up.”
– r/DIYHeatPumps, May 2026 (15 upvotes)
| Symptom | Root cause | What it costs you |
|---|---|---|
| Hissing at a connection, oily smear on the flare | Flare not deburred, or nut overtightened | Lost charge, compressor damage, a $200-500 service call |
| Cooling fades after a few weeks | Vacuum cut short; moisture left in the lines | Ice inside the metering device, reduced capacity, wear |
| Water dripping from the indoor head | Drain slope wrong or hose kinked | Wall and ceiling damage, mold behind the unit |
| Breaker trips on startup | Circuit undersized or shared with other loads | Nuisance trips; undersized wire is a fire risk |
| Unit short-cycles all day | System oversized for the room | Poor dehumidification, more compressor wear |
When a unit fails in the field, the technician does not start by swapping parts. They start with pressures, temperatures, and the same symptom-to-cause reasoning you would follow in ac repair process explained, which walks through diagnosis from the first reading to the fix.
Mechanical issues that develop over time often require systematic troubleshooting to identify underlying operational faults before replacing major components. Calling a qualified air conditioning repair service helps ensure that electrical connections, refrigerant pressure, and air movement are properly tested, preventing smaller operational defects from causing unexpected system failure.
Refrigerant, Electrical, and Permit Rules You Cannot Skip
Federal law requires an EPA Section 608 certification to handle refrigerant, most towns require a permit for the circuit, and since 2025 new equipment uses lower-GWP refrigerants like R-32 instead of R-410A. These are hard boundaries, not recommendations.
The certification rule is federal and applies in every state: anyone who opens a refrigerant circuit, recovers refrigerant, or recharges a system must hold the right EPA 608 credential. Precharged DIY kits with factory-sealed quick connectors are designed to keep the loop closed, which is how a homeowner stays on the legal side of that line.
On the refrigerant itself, the phase-down under the AIM Act means equipment manufactured for the U.S. market no longer ships with R-410A; R-32 and R-454B are the replacements. When you compare kits, note the refrigerant on the label, because a service tech in 2026 stocks gauges and recovery gear for the newer gases. If efficiency is part of the decision, the ENERGY STAR ductless listings show which models clear the efficiency bar before you buy.
Electrical rules are set locally, so they vary the most. Expect a dedicated circuit, a proper disconnect, and an inspection in most jurisdictions, and in several states only a licensed electrician can pull the permit. Ask the building department before you run a single wire. This walkthrough is general guidance for typical residential systems; your equipment manual and local codes override anything stated here.
DIY vs Professional: Where To Draw the Line
DIY pays when the job is one zone, the line run is short, and you are comfortable with the physical work. It stops paying when refrigerant handling, a panel upgrade, or a multi-zone line set enters the picture. Installed quotes commonly run $2,000 to $12,000 depending on zones, line length, and electrical work, with local labor rates moving the number.
Supplemental heating systems often play a vital role during cold months when primary heating units require additional support to keep a living space balanced. In cooler regions where winter weather places heavier demands on home equipment, regional solutions such as Seattle heating services from Essential Heating and Air can help maintain steady indoor temperatures when adding targeted climate control options.
| Work item | Safe for a homeowner? | Why |
|---|---|---|
| Indoor bracket and mounting | Yes | Level check and studs are straightforward |
| Line-set hole and routing | Yes | 2-3 in. hole, slight outward slope, no tight bends |
| Condenser pad and placement | Yes | Two-person lift, clearance per manual |
| Flare connections | Yes, with practice | Deburr, flare, torque to spec |
| Vacuum and leak check | Yes, with pump and gauges | Hold below 500 microns, then watch the gauge |
| Opening refrigerant valves | Precharged kits only | Loose refrigerant work needs an EPA 608 cert |
| Extending or brazing the line set | No | Certification plus torch skill; a botched braze leaks |
| Circuit, breaker, and disconnect | Usually no | Permit and inspection; some states require a licensed electrician |
| Service panel upgrade | No | Licensed electrician, permit required |
One caution before you commit: installers are often hesitant to service equipment they did not install, and a warranty claim on a DIY job lives or dies on the manual’s requirements. A defective part stays covered, but a documented installation error voids it.
Verifying the Installation With Five Checks
Run five checks after startup: air-side temperature difference, condensate flow, steady current draw, stable pressures, and no refrigerant smell. Each one has a number or a visible result you can confirm in the first hour.
- Delta-T: 15-20°F on cooling between return and supply air, or the manual’s value.
- Condensate: a steady drip from the drain within a few minutes of startup.
- Current draw: close to the nameplate rating, without the breaker tripping.
- Pressures: stable readings on the gauges, no climbing on a hot afternoon.
- Smell: no refrigerant odor at any connection, indoor or outdoor.
If all five pass, the install is sound. What keeps it sound is routine care: wash the filter every few weeks in heavy use, clear the drain, and keep the condenser coil free of debris. The full schedule with honest DIY-versus-pro splits is in how often should hvac maintenance be done, and the seasonal versions are worth a bookmark too.
Ongoing care is essential for protecting the efficiency and operating lifespan of ductless units after setup. Staying consistent with filter cleanings, coil inspections, and seasonal tune-ups prevents minor operational issues from causing system downtime. Integrating routine residential comfort system maintenance into a regular home care plan ensures consistent airflow and steady temperature control throughout every season.
Before cooling season, run the spring hvac maintenance tips list, which covers the filter, drain, and coil checks that matter after months of standby.
Install the hardware, hire the refrigerant. That single line separates a successful weekend project from the callbacks that eat the savings.
Frequently Asked Questions
Can I install a mini split system myself?
The honest version of how to install mini split systems is DIY for the hardware and professional for the refrigerant.
Mounting, line routing, and connections are within reach for a careful homeowner using a precharged kit with factory-sealed connectors. The refrigerant and the circuit are where certification and permits apply.
How much does it cost to install a mini split?
Professional installation commonly runs $2,000 to $12,000 depending on the number of zones, line set length, and electrical work, and local labor rates move the number within that band. A DIY install trades most of the labor cost for your time and roughly $500 to $1,000 in tools.
Is a 110V or 220V mini split cheaper to run?
At the same cooling load, a 220V unit is generally more efficient because it draws less current for the same work. The practical difference matters most on units above 9,000 BTU, which typically require a dedicated 208-230V circuit anyway.
How many square feet does a 12,000 BTU mini split cover?
Roughly 400 to 550 square feet in a normally insulated space, with insulation, window area, and climate shifting the number. Treat it as a starting estimate and confirm with a load calculation for anything but a straightforward room.
Do I need a permit to install a mini split?
Most jurisdictions require a permit for the electrical work, and some for the refrigerant side as well. Call your building department before you buy, because permit and inspection requirements vary by town and by state.
Last modified: October 6, 2026