The fastest ways to improve indoor air quality follow one order: cut the pollution sources, measure the problem, ventilate, filter what remains, and control moisture. Do those five steps in that sequence and you can hit concrete targets: humidity between 30 and 50 percent, PM2.5 below 35 micrograms per cubic meter, and carbon dioxide under roughly 1,000 parts per million while the room is occupied.
That sequence matters more than any single gadget. The EPA, which publishes the most-cited framework on this topic, ranks source control first, ventilation second, and air cleaning third. Americans spend about 90 percent of their time indoors, the agency reports, so the payoff is not cosmetic. If your air smells stale, your allergies flare indoors, or a bedroom feels heavy by morning, this walkthrough is written for you. It works in apartments and houses, rented or owned; the few steps that need a landlord or a licensed contractor are flagged as you go.
Ways to Improve Indoor Air Quality: What Actually Works
The order is what works: remove sources, add fresh air, then filter what remains. Buying a purifier first is the most common mistake, because a purifier cannot outwork a constant source like an old carpet or an unvented stove.
The EPA’s guidance on indoor air quality names three strategies: source control, improved ventilation, and air cleaners or filtration. Source control is usually the most effective and the most cost-efficient. Ventilation costs little when the weather cooperates. Filtration is the only strategy that keeps working while you sleep, which is why it comes third, not first.
The five steps below turn those three strategies into a sequence you can finish in a weekend, with measurable checkpoints at each stage.
Step 1: Cut the Sources Before You Buy Anything
Walk through your home and list what actually emits particles or gases: a gas stove, candles, air fresheners, cleaning supplies, old carpet, pet dander, damp corners. Source control means removing or shrinking those emitters, and it is the most effective step, because every later step works against the sources you leave behind.
Start in the kitchen and the bedrooms, where you spend the most time. Cook with the range hood on, or open a window. Burn fewer candles, especially paraffin ones, and skip plug-in air fresheners entirely; the American Lung Association treats scented products as a source to drop, not a fix. Vacuum with a HEPA-bag vacuum once or twice a week if you have pets.
Soft furnishings and floor coverings are major reservoirs for dust mites, pet dander, and trapped outdoor fine particles. Routine deep cleaning helps pull embedded allergens out of dense fibers before they recirculate back into the living space. For coastal residents, arranging professional carpet cleaning in Hilton Head offers an effective way to control persistent indoor sources and maintain cleaner air throughout high-traffic rooms.
Two safety stops come before anything else. If you smell gas, do not flip switches, do not use your phone indoors, and leave the house before calling your gas company. And if your home predates roughly 1980, do not disturb old flooring, insulation, or pipe wrap until asbestos has been tested; that job belongs to a professional.
On paper this sounds like common sense. In practice, most people skip it, buy a purifier, and wonder why the dust returns by Tuesday.
Step 2: Test the Air So You Know What You’re Fixing
Measure before you treat. A combined PM2.5 and CO2 monitor costs about $50 to $150, a hygrometer under $20, and a radon test kit $15 to $30. You cannot tune a problem you have not quantified.
Use these four targets as your acceptance criteria:
- Humidity: 30 to 50 percent, per EPA moisture guidance; anything above 60 percent is a mold risk.
- PM2.5: below 35 µg/m³ as a 24-hour average, the EPA’s outdoor standard, used here as the indoor reference.
- CO2: under about 1,000 ppm while the room is occupied, the traditional ventilation benchmark.
- Radon: below the EPA action level of 4 picocuries per liter; test every two years or after a major renovation.
Place the monitor at breathing height, away from windows, vents, and the kitchen. Leave it running for three days before you trust the reading. A single afternoon sample will lie to you.
Step 3: Ventilate
Ventilation is the practice of bringing outdoor air in to dilute what is trapped inside, and it is the cheapest improvement that works. Open windows for at least 10 minutes a day, and run the bathroom and kitchen exhaust fans during and after the activity that creates moisture or smoke. The American Lung Association recommends that 10-minute window habit even in winter.
Most forced-air heating and cooling systems do not mechanically bring in fresh air, the EPA notes, so natural ventilation is doing more work than you think. The difference shows up fastest in bedrooms. One r/DIY homeowner who added a CO2 monitor found their closed bedroom running over 1,000 ppm during the day and past 1,500 overnight, a level the thread’s regulars called unhealthy.
“I recently got a CO2 monitor and noticed that the bedroom in my 1 bd rental gets over 1000 ppm when I’m around for longer periods of time and would occasionally go over 1500 overnight.”
– r/DIY, December 2025 (31 upvotes)
The fix does not need to be dramatic. The same thread’s top answer, at 93 upvotes, was two words: “Open the window.” A second commenter put it as “Open a tiny crack. Some is better than none.” Leave the bedroom door open at night, or crack a window an inch, and watch the CO2 reading fall.
Two caveats. On wildfire smoke days, check the outdoor air quality first on AirNow and close up instead; ventilation only helps when the outdoor air is cleaner than what is inside. And for homes that stay stuffy no matter the windows, a heat or energy recovery ventilator is the real fix, but that is ductwork and a professional install.
Step 4: Filter the Air
Filtration is the practice of pulling particles out of air as it recirculates, and it comes after sources and ventilation: upgrade the HVAC filter first, then add a portable purifier sized to the room. Both only work if you maintain them on a schedule.
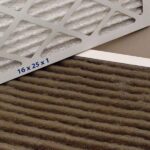
Start with the filter inside your heating and cooling equipment, because it cleans the whole house whenever the blower runs. The size is printed on the filter frame, so match it exactly and change it every one to three months, or sooner with pets. The replacement rhythm belongs inside your regular service routine, which is why how often should hvac maintenance be done matters as much as which filter you pick.
| Filter grade | What it captures | Best fit | Change interval |
|---|---|---|---|
| MERV 1-4 | Large dust, lint, pollen | Minimum protection; better than a bare return | 1-3 months |
| MERV 8 | Pollen, dust mites, mold spores | Default for most homes; safe for standard blowers | 1-3 months |
| MERV 11 | Adds smoke and fine dust | Allergy households, pet homes | 1-3 months |
| MERV 13 | Fine particles, smoke, most allergens | Asthma or particle-sensitive homes; confirm airflow first | 1-3 months, inspect sooner |
MERV 8 is the sensible default: it catches the allergens that bother most people without choking the blower. MERV 13 removes more, including finer smoke particles, but it also raises airflow resistance. If you want MERV 13, have a technician confirm the equipment can handle it before you commit; a starved blower freezes coils and shortens the life of the equipment.
Proper airflow maintenance helps extend system lifespan while maintaining consistent indoor temperature control throughout humid seasons. When cooling units operate efficiently, indoor filtration systems can perform at their best to remove airborne particles. Residents managing home cooling needs in humid coastal regions often look for Tampa Bay Air Conditioning support to evaluate duct systems and maintain balanced humidity levels indoors.
Heating systems also rely on steady airflow to maintain proper indoor conditions and prevent internal components from overheating. When restricted filters or mechanical issues disrupt circulation during colder months, arranging timely heating repair helps restore safe system function and keeps filtered air moving smoothly throughout the home.
For a portable purifier, size matters more than brand. Match the CADR to the room’s square footage using the manufacturer’s stated room size, run it continuously, and replace the filter on the schedule printed on the unit. A purifier parked in a corner with an expired filter is a nightlight.
Step 5: Control Moisture
Moisture control is the last step and the one that prevents whole classes of problems: mold, dust mites, and that musty smell in basements and bathrooms. Keep humidity in the 30 to 50 percent range with a dehumidifier or by fixing the leak, because mold grows wherever moisture sits.
The EPA’s rule of thumb is that mold problems start when indoor humidity stays above 60 percent. A dehumidifier in the basement, an exhaust fan in the bathroom, and a quick fix for any dripping pipe cover most cases. Empty the dehumidifier reservoir on a set day, or it quietly turns back into a source.
If you find mold, size decides the route. Spots smaller than about 10 square feet, roughly a three-by-three-foot patch, are a DIY job: scrub with detergent and water, dry completely, and wear an N95 mask. Never mix bleach with ammonia. Larger areas, mold inside ductwork or wall cavities, and any growth after flooding call for a professional remediation contractor, and that is a cost worth paying.
Seasonal change is when moisture problems announce themselves, which is why the spring spring hvac maintenance tips checklist includes the condensate drain and the fall fall hvac maintenance tips checklist includes the humidifier. Both are places water hides until it becomes a smell.
Common Failure Points
Six failures account for most wasted money on this topic. Run through them before you spend another dollar:
- Buying a purifier before removing the source; the purifier can never catch up.
- Installing the wrong filter size, or a MERV grade the blower cannot handle.
- Opening windows on a high-AQI day and importing smoke instead of fresh air.
- Letting the dehumidifier reservoir overflow or the filter go past its date.
- Chasing smell with candles and air fresheners, which add particles while masking the cause.
- Trusting a single afternoon test instead of a three-day reading.
By Wednesday the bedroom air still smells like the closet, and the CO2 monitor has been blinking 1,400 all week. The door is closed. The purifier is new. The filter is still in its wrapper because nobody matched the size on the frame. It is a familiar scene, and every piece of it is fixable in the order above.
When to Call a Professional
Call a professional for radon mitigation, mold larger than 10 square feet, ductwork, and anything involving gas, refrigerant, or structural changes. Changing filters, cleaning registers, running dehumidifiers, and removing visible surface mold are safe DIY territory.
You can safely do: filter changes, register and vent cleaning, dehumidifier placement, source removal, and surface mold scrubbing under 10 square feet. You should hire out: radon mitigation systems, mold remediation beyond a small patch, HVAC repairs, equipment replacement, and any mechanical ventilation install that touches ductwork.
Two professional services deserve extra scrutiny. Duct cleaning is only justified when ducts are visibly contaminated or blocked, per the EPA; routine cleaning is not recommended. And if your heating or cooling equipment is the reason a room feels stuffy, fix the equipment before blaming the air. The ac repair process explained in our HVAC guide shows how a diagnosis runs, and if replacement is on the table, how long does air conditioning installation take helps you plan the downtime. Either way, a licensed technician, never a handyman, touches refrigerant.
Regional weather variations can also impact how local heating and cooling systems operate throughout the year. For homeowners in Mountain City, GA, maintaining proper airflow and scheduled system checks helps ensure indoor humidity levels remain balanced and air filters function efficiently during seasonal temperature shifts.
Frequently Asked Questions
How can I improve the indoor air quality in my home?
Remove pollution sources first, then ventilate daily, then filter with an HVAC filter and a room-sized purifier, and keep humidity between 30 and 50 percent. That sequence, in that order, is the ways to improve indoor air quality that produce measurable results.
How do I naturally purify the air in my house?
Open windows for at least 10 minutes a day and run exhaust fans while cooking and showering. Fresh outdoor air dilutes pollutants; on smoky days, close up and filter instead.
What are signs of poor indoor air quality?
Stuffy rooms that do not clear, musty smells, condensation on windows, worsening allergy or asthma symptoms indoors, and a CO2 monitor above roughly 1,000 ppm. Dust settling quickly after cleaning is another clue.
Dealing With Poor Indoor Air Quality
Dealing with the problem means testing first, then working the five steps in order. If readings stay bad after source removal, ventilation, filtration, and moisture control, hire a professional to investigate ductwork, mold, or radon.
The information here is general guidance, not medical or professional advice. Health symptoms, a suspected gas leak, or mold damage call for an expert who can inspect your specific home.
The whole sequence fits in a weekend and most of it costs less than one purifier. If you are planning the rest of the house at the same time, our Home Improvement guides cover the projects that change how a home feels. Start with the kitchen hood and the bedroom door, and measure again in three days.
Last modified: October 12, 2026