An RV toilet has two seals that fail. The floor flange seal, which is a foam or rubber gasket between the toilet base and the floor, is functionally similar to the wax ring on a residential toilet. The ball valve seal, which is the rubber gasket inside the toilet that holds water in the bowl, is unique to RV toilets and is the seal that fails most often. If the bowl will not hold water, the ball valve seal is the problem. If water leaks onto the bathroom floor around the base, the floor flange seal is the problem.
Both seals can be replaced in under an hour with basic hand tools. The parts cost $10 to $30 for a seal kit specific to your toilet brand. RV toilets are made by two companies, Dometic and Thetford, and the seals are not interchangeable. Here is how to identify your toilet, replace the seal, and avoid the mistake that cracks the toilet base.
First: Identify Your RV Toilet Brand and Model
The brand name is printed on the toilet, typically on the front of the bowl, on the pedal, or on a label inside the seat. Dometic toilets are the most common in newer RVs. Thetford toilets are common in older RVs and some current models. The model number is on a label, usually on the back of the toilet or under the seat. You need the brand and model number to buy the correct seal kit. A Dometic seal will not fit a Thetford toilet. A Thetford Aqua-Magic seal is different from a Thetford Bravura seal. Match the kit to the model.
Which Seal Is Failing
The bowl will not hold water. You fill the bowl, and within minutes or hours the water has drained into the holding tank. The floor is dry. This is a ball valve seal failure. The rubber seal inside the toilet that the flush ball presses against has worn out, hardened, or accumulated debris that prevents it from sealing. The water leaks past the seal and into the tank, not onto the floor.
Water appears on the bathroom floor around the base of the toilet. The bowl holds water or does not hold water. This is a floor flange seal failure. Water that should go into the holding tank is seeping out at the connection between the toilet and the floor flange. The seal may have been damaged by overtightening the toilet bolts, by the toilet rocking, or simply by age.
Both problems at once are possible. If the bowl will not hold water and the floor is wet, both seals need replacement. Replace the floor flange seal when the toilet is removed to access the ball valve seal. The floor seal is cheap and the toilet is already out.
Replacing the Ball Valve Seal
Turn off the water supply to the RV. If the RV is connected to city water, disconnect the hose. Turn off the RV water pump. Open a faucet to release pressure in the water lines. Flush the toilet to empty the bowl and the water valve.
Disconnect the water supply line from the toilet. The connection is at the back of the toilet, typically a 1/2-inch threaded fitting. Disconnect any electrical connections if your toilet has an electric flush. Most RV toilets are manual, but some newer models have an electric flush valve or macerator.
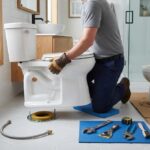
Remove the toilet from the floor. The toilet is held to the floor flange by two bolts, one on each side, with plastic caps covering them. Pry off the caps. Remove the nuts. The toilet lifts straight up. It is lightweight, typically 10 to 15 pounds, much lighter than a residential toilet. Place the toilet on a drop cloth or a piece of cardboard. The bottom of the toilet will have residual water and waste residue. Handle it accordingly. Wear gloves.
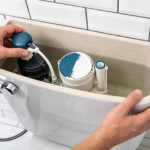
The ball valve seal is the large rubber gasket inside the toilet bowl, visible when you look down into the toilet from above. On a Dometic toilet, the seal is held in place by a metal retaining ring with screws inside the bowl. Remove the screws. Lift out the retaining ring. Pull out the old seal. It may be stuck and require prying with a flathead screwdriver. Clean the seal groove thoroughly. Any debris or mineral buildup in the groove prevents the new seal from seating properly. Install the new seal. The seal has a lip or a ridge that fits into the groove. Press it firmly into place. Reinstall the retaining ring and tighten the screws evenly. Do not overtighten. The screws thread into plastic. Overtightening strips the holes and the retaining ring will not hold the seal.
On a Thetford toilet without a retaining ring, the seal presses into a groove on the inside of the bowl. The seal kit includes a new seal and sometimes a lubricant. Apply the lubricant to the new seal as directed. Press the seal into the groove by hand. It should seat fully without tools. If the old seal was glued in place, which is unusual but happens on older models, clean the glue residue from the groove before installing the new seal.
While the toilet is off the floor, replace the floor flange seal. The old seal is a foam or rubber ring on top of the floor flange. Pull it off. Place the new seal on the flange. The seal is not adhesive. It sits on the flange and compresses when the toilet is bolted down.
Set the toilet back onto the floor flange. The bolts must align with the holes in the toilet base. Lower the toilet straight down. Tighten the floor bolts by hand, then snug them slightly with a wrench. Do not overtighten. The toilet base is plastic. Overtightening the floor bolts is the single most common cause of a cracked RV toilet base. The bolts are tight enough when the toilet does not rock and the nuts offer light resistance to the wrench.
Reconnect the water supply line. Turn the water back on. Flush the toilet several times to fill the bowl and test the seal. The bowl should hold water. The floor around the base should be dry. If the bowl slowly loses water after the seal is replaced, the seal is not fully seated, debris is caught between the seal and the ball, or the ball itself is scratched and is damaging the new seal. Inspect the ball for scratches or roughness before installing the new seal. A damaged ball will destroy a new seal quickly. Replacement balls are available in some seal kits or separately.
Preventing Future Seal Failure
Apply RV toilet seal lubricant every few months. The lubricant is a spray or a liquid applied directly to the seal. It keeps the rubber pliable and prevents it from drying out and hardening. A dry seal cracks and leaks. A lubricated seal lasts years longer. Do not use petroleum-based lubricants on RV toilet seals. Petroleum jelly and similar products degrade the rubber. Use only lubricants labeled as safe for RV toilet seals.
Keep the toilet bowl partially filled with water when the RV is in storage. A dry seal dries out faster than a seal submerged in water. Add enough water to cover the seal completely. The water also provides a barrier against holding tank odors entering the RV through a seal that is not perfectly airtight. Do not use harsh chemical toilet bowl cleaners. Bleach and abrasive cleaners damage the rubber seal. Use RV-specific toilet chemicals and cleaners.
Frequently Asked Questions
How do I know if my RV toilet is Dometic or Thetford?
The name is on the toilet. Dometic toilets are usually white with a foot pedal flush on the front or side. The pedal operates a ball valve directly. Thetford toilets have a pedal that may be on the front, side, or top, depending on the model. The Aqua-Magic series is the most common Thetford line. If the name is worn off, the pedal shape and the overall look of the toilet can be matched to photos online. RV parts websites have identification guides. The seal kit packaging also shows photos of the toilets it fits.
My RV toilet will not hold water even with a new seal. What else could it be?
The flush ball is scratched or pitted. A damaged ball surface tears the new seal the first time it is operated, and the leak continues. Replace the ball along with the seal. The ball valve spring is broken or weak, and the ball is not pressing firmly enough against the seal to create a watertight closure. The spring or the flush mechanism must be repaired or replaced. The toilet base is cracked. A hairline crack in the plastic base allows water to leak into the holding tank without passing through the ball valve. The crack is difficult to see. Inspect the base with a flashlight. A cracked base requires replacing the entire toilet.
At what point is it better to replace the entire RV toilet?
Replace the toilet if the base is cracked, if the flush mechanism is broken and replacement parts are not available for the model, or if the toilet is more than 15 years old and multiple components are failing. A new RV toilet costs $150 to $300 and installs in the same way as the old one, using the same floor flange. Replacing the toilet is a straightforward swap. The plumbing and floor flange remain unchanged.
Last modified: June 18, 2026