The old toilet has been in the house since the Nixon administration. It uses 5 gallons per flush. The porcelain inside the bowl is etched with mineral deposits that no amount of scrubbing can remove. The seat is the wrong shade of white because it was replaced at some point in the 1990s and the new seat and the old bowl were never the same color. You have decided to replace the entire toilet. The new one is in a box in the garage. It uses 1.28 gallons per flush. It will pay for itself in water savings within two years.
Replacing a toilet is a two-hour job for a first-timer. It involves removing the old toilet, inspecting and possibly repairing the closet flange, installing a new wax ring, setting the new toilet, and reconnecting the water supply. The toilet is heavy. The wax ring is messy. The bolts will be rusted. None of these things are difficult. They are just unpleasant in a way that makes the job feel harder than it is. This guide covers the full sequence.
Step 1: Remove the Old Toilet
Turn off the water supply at the shutoff valve behind the toilet. Flush the toilet and hold the handle down to drain as much water from the tank as possible. Disconnect the water supply line from the fill valve shank under the tank. Place a small bowl and a towel under the connection. Water will drain from the supply line and from the fill valve.
Remove the remaining water from the tank and the bowl. Soak it up with a sponge or a towel, wring it into a bucket, and repeat until both are dry. Water left in the bowl will spill onto the floor when the toilet is tipped during removal. The water in the bowl is clean tank water, not wastewater, but it still does not belong on the bathroom floor.
Pry off the plastic caps covering the closet bolts at the base of the toilet. Remove the nuts from the bolts with a socket wrench. If a bolt spins without loosening, the bolt is rusted or the slot in the flange is broken. Hold the bolt head from above with pliers. If the bolt is too corroded to save, cut it off with a hacksaw blade. Replacement bolts are included with new wax rings.
Rock the toilet gently side to side to break the wax seal, then lift it straight up. A two-piece toilet weighs 60 to 80 pounds. Lift with your legs, not your back. Carry the old toilet outside or to the garage. It is going to the landfill or to a recycling center. Do not set the old toilet on a finished floor without a drop cloth underneath. Residual water and wax will stain.
Step 2: Inspect and Repair the Closet Flange
The closet flange is the plastic or metal ring screwed to the floor around the drain pipe. The toilet bolts slide into slots in the flange. This is the only part of the installation that can turn a two-hour toilet swap into a half-day project.
Scrape the old wax off the flange with a plastic putty knife. Stuff a rag into the drain opening to block sewer gas and prevent anything from falling in. Inspect the flange for damage:
- Flange is intact and the bolt slots hold bolts securely: proceed to Step 3.
- Flange is cracked or the bolt slot is broken: install a metal repair ring over the existing flange. The repair ring costs $8 to $15 and screws into the subfloor through the existing flange. It provides new bolt slots.
- Flange is rusted through (cast iron) or broken into pieces (plastic): the flange must be replaced. This requires cutting the old flange off the drain pipe and installing a new one. If you are not comfortable cutting PVC or cast iron pipe, call a plumber. This is the point where the toilet swap becomes a plumbing repair.
The top of the flange should sit flush with or slightly above the finished floor. If the flange is recessed below the floor, which happens when a second layer of tile has been added, use a jumbo wax ring or a flange extender kit to raise the sealing surface. A wax ring cannot bridge a gap of more than 1/2 inch between the flange and the toilet base.
Step 3: Prepare the New Toilet
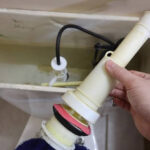
Unbox the new toilet. A two-piece toilet arrives with the tank and bowl separate. The tank bolts to the bowl with a tank-to-bowl gasket between them. The instructions show the assembly sequence.
Install the tank-to-bowl gasket on the flush valve opening at the bottom of the tank. The gasket is a thick rubber ring that seals the connection. Set the tank onto the bowl, aligning the bolt holes. Insert the tank bolts with rubber washers inside the tank and metal washers and nuts underneath the bowl. Tighten the nuts evenly, alternating sides a few turns at a time. The bolts should be snug, then a quarter turn past snug. Overtightening cracks the porcelain tank or bowl. Tighten until the tank does not rock on the bowl.
Install the toilet seat if it was not pre-installed. The seat bolts pass through the bowl and are tightened from underneath with plastic nuts. Hand-tighten, then a quarter turn with a screwdriver. Plastic seat nuts crack under excessive torque.
Step 4: Set the New Toilet
Remove the rag from the drain opening. Place the new wax ring on the flange, centered over the opening, with the plastic horn pointing down into the pipe. If using a plain wax ring without a horn, center it by eye. Press the wax ring gently onto the flange so it sticks in place.
Insert new closet bolts into the flange slots. The bolt heads go into the wide part of the slot and slide to the narrow end. Position the bolts vertically so they align with the holes in the toilet base. Plastic bolt keepers or a small amount of plumber’s putty under the bolt heads holds them upright.
Lift the toilet and position it over the flange. Lower it straight down so the bolts pass through the holes in the base. Do not slide the toilet into position. Sliding smears the wax and creates a leak path. Once the toilet base is on the floor, press down firmly on the bowl rim on both sides to compress the wax. Do not sit on the toilet to compress it. Body weight will crack the porcelain against an uneven flange.
Place a plastic washer and a metal washer over each bolt. Thread the nut and tighten by hand, then alternate sides with a wrench, a few turns at a time. Tightening one side fully before starting the other tilts the toilet and breaks the seal on the loose side. The nuts should be snug. Overtightening cracks the porcelain. If the toilet rocks, slide shims under the low side until it is stable, then tighten. Bolt torque alone will not stabilize a rocking toilet.
Step 5: Connect the Water and Test
Connect the water supply line to the fill valve shank under the tank. Hand-tighten the nut, then a quarter turn with pliers. Turn the water supply on slowly. Let the tank fill and check the supply line connection for leaks with a dry paper towel.
Flush the toilet. Watch the base for any sign of water. Run a dry paper towel around the base on all sides. Moisture means the wax ring did not seal. The toilet must come back up. A wax ring compressed once cannot be reused. Replace it with a new ring and try again.
If the base is dry after multiple flushes, the seal is good. Wait 24 hours before caulking around the base. The delay allows any slow seep to reveal itself before it is trapped behind a caulk bead. When caulking, leave a 1-inch gap at the back of the toilet base. The gap allows water from a future leak to escape onto the floor where it will be noticed, rather than being trapped under the toilet where it will rot the subfloor unseen.
What Replacing a Toilet Costs
| Item | Cost |
| Standard two-piece toilet (1.28 gpf) | $150-400 |
| Wax ring with horn | $4-8 |
| New supply line (braided stainless) | $8-12 |
| Flange repair ring (if needed) | $8-15 |
| Plumber installation labor | $200-400 |
| DIY total | $170-440 |
| Pro total (installed) | $370-840 |
Frequently Asked Questions
Should I buy a one-piece or two-piece toilet?
A two-piece toilet is easier to carry and install because the tank and bowl are separate. Each piece weighs 40 to 50 pounds. A one-piece toilet weighs over 100 pounds and is difficult for a single person to position over the flange bolts. The one-piece toilet has no seam between the tank and bowl, which makes it easier to clean, but the installation difficulty makes it a two-person job at minimum. For DIY, buy a two-piece toilet.
There is a gap between the back of the new toilet tank and the wall. Is that normal?
Yes. The toilet’s position is determined by the closet flange, not by the wall. If the flange is 12 inches from the wall, which is standard rough-in, a toilet designed for a 12-inch rough-in will have a small gap at the back. If the flange is 10 or 14 inches from the wall, the toilet will sit further from or closer to the wall than expected. Measure the rough-in distance from the wall to the center of the flange bolts before buying a toilet. A toilet designed for a 12-inch rough-in will not fit a 10-inch rough-in without hitting the wall.
How do I dispose of the old toilet?
Most municipal waste services will not collect a toilet as regular trash. Take it to a landfill or transfer station. Some recycling centers accept porcelain toilets and crush them for aggregate. Call ahead. A toilet in working condition can be donated to a Habitat for Humanity ReStore. Call the ReStore to confirm they accept toilets. Some do, some do not. If the toilet is non-functional or heavily stained, landfill is the only option.
The New Toilet That Pays for Itself
A new toilet flushes with less than a third of the water of an old one. The water bill drops. The bowl stays cleaner because the new glaze resists mineral buildup. The seat matches the bowl. The flush is quiet. The lever does not need to be jiggled.
The old toilet had a good run. It served through multiple presidents and countless flushes. Its retirement is well-earned. The new one uses less water, makes less noise, and will not require a wax ring replacement for another 20 years.
Last modified: June 18, 2026