The basement is 800 square feet of potential. You have decided to finish it yourself, which is the difference between a $30,000 contractor-built basement and a $12,000 basement where you supplied the labor. The trade is your evenings and weekends for the next three to six months. The work is not beyond a homeowner who can measure, cut, and follow a sequence. What is beyond most homeowners is electrical and plumbing, which require licensed trades and permits in nearly every jurisdiction. Knowing where the DIY line is drawn, legally and practically, is the first decision of the project.
This guide covers finishing a basement as a DIY project: what you can do, what you must hire out, the sequence of work, the tools you will buy and the tools you will rent, a realistic timeline for weekend-only labor, and the mistakes that first-time basement finishers make that cost weeks of rework.
What a Homeowner Can and Cannot Do
The legal line varies by jurisdiction, but the practical line is consistent across North America. A homeowner can perform framing, insulation, drywall, painting, trim, and flooring without a license. Electrical work requires a licensed electrician and a permit. Plumbing work requires a licensed plumber and a permit. HVAC work requires a licensed HVAC technician. Some jurisdictions allow a homeowner to pull an electrical or plumbing permit and perform the work themselves if they pass an inspection. Most do not. Check with your local building department before planning to wire outlets or run drain lines.
The work a homeowner can legally perform accounts for roughly 60 percent of the labor hours in a basement finish. The licensed trades account for the remaining 40 percent. The DIY savings come from the 60 percent you do yourself. The 40 percent you hire out costs the same whether a general contractor or a homeowner writes the check. The general contractor adds 15 to 25 percent markup on top of the subs’ invoices. Acting as your own GC, hiring the electrician, plumber, and HVAC contractor directly, saves that markup.
| Task | DIY? | Notes |
| Moisture test and sealing | Yes | No license required |
| Rigid foam insulation | Yes | Glue and tape |
| Framing | Yes | Carpentry, no license required |
| Electrical rough-in | No | Licensed electrician + permit |
| Plumbing rough-in | No | Licensed plumber + permit |
| Drywall hanging | Yes | Heavy but uncomplicated |
| Drywall taping and mudding | Yes | Skill develops fast; the ceiling is the hardest part |
| Painting | Yes | Prime first, then two coats |
| Trim and baseboard | Yes | Miter saw required |
| Flooring (LVP or carpet) | Yes | LVP is DIY-friendly; carpet is best left to pros |
| HVAC ductwork | No | Licensed HVAC tech |
The Sequence: What Order to Do Everything
The order of operations in a basement finish is not flexible. Each step depends on the step before it. The sequence is:
- Moisture test and waterproofing. Before anything else. If the basement leaks, fix it from the outside or install interior drain tile. Finishing a wet basement is the most expensive mistake in this guide.
- Permits. Apply for the building permit, electrical permit, and plumbing permit. The building department reviews plans and issues permits. This takes 1 to 3 weeks. Use this time to order materials.
- Plumbing rough-in. The plumber installs drain lines and supply lines. If the slab must be cut for a bathroom, the plumber does this now, before any framing.
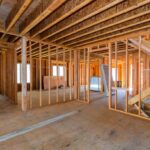
- Framing. Exterior walls first, then interior partition walls. The framing defines the rooms.
- Electrical rough-in. The electrician runs wires to outlet, switch, and light locations. This must happen after framing and before insulation, because the wires run through the stud cavities.
- Insulation. Rigid foam on exterior walls. Batts in interior walls for soundproofing.
- Drywall. Hang, tape, mud, sand. The ceiling goes up first, then the walls.
- Paint. Prime, then two coats. Paint before flooring so drips do not matter.
- Flooring. LVP, carpet, or tile. Flooring goes in last so it is not damaged by ladders, drywall mud, and paint.
- Trim and finish. Baseboard, door casing, doors, light fixtures, outlet covers.
- Final inspections. Building inspector, electrical inspector, plumbing inspector sign off.
Tools You Will Buy and Tools You Will Rent
Buy: Hammer, 4-foot level, 2-foot level, framing square, chalk line, tape measure (25-foot), utility knife, drywall T-square, drywall saw, screw gun or drill, miter saw (a 10-inch compound miter saw is the most useful power tool in the project), jigsaw, pry bar, locking pliers, extension cords, work lights.
Rent: Powder-actuated fastener tool (Ramset) for attaching bottom plates to concrete, drywall lift for ceiling drywall, paint sprayer if painting the ceiling. The drywall lift costs $30 per day and saves your shoulders from holding 50-pound sheets overhead while screwing them in. It is the best rental value in the entire project.
Realistic Timeline for Weekend-Only DIY
| Phase | Weekends | Notes |
| Permits, material ordering | 0 (weekday calls) | Overlaps with everything; start early |
| Plumbing rough-in (hired) | 0 (pro does it) | 2-3 weekdays while you are at work |
| Framing | 2-3 | Exterior walls week 1, interior week 2 |
| Electrical rough-in (hired) | 0 (pro does it) | 1-2 weekdays |
| Insulation | 1 | Cutting and gluing rigid foam |
| Drywall hanging | 2-3 | Ceiling first, rent a lift. Get help for the ceiling. |
| Drywall finishing | 2-3 | Tape, mud, sand. Drying time governs. |
| Paint | 1 | Prime + 2 coats |
| Flooring | 1-2 | LVP clicks together quickly |
| Trim, doors, fixtures | 2 | Baseboard, casing, lights, outlet covers |
| Total active weekends | 11-15 | 3-4 calendar months |
The project takes 3 to 4 calendar months working weekends. The active working time is roughly 180 to 250 hours. The weeks between weekends are used for material ordering, permit waiting, and subcontractor scheduling. A basement finished entirely by a general contractor takes 4 to 6 weeks of calendar time because the trades work sequentially during weekdays. The DIY timeline is roughly triple the contractor timeline because work is compressed into Saturdays and Sundays.
The Mistakes That Cost Weeks of Rework
- Finishing before fixing moisture. Water comes through the wall six months after the drywall is painted. The bottom 2 feet of drywall and insulation must be removed. The wall must be waterproofed. The drywall must be rehung, remudded, and repainted. This is the most expensive mistake in basement finishing, and it is entirely preventable with a 48-hour plastic sheet test before any work begins.
- Not pulling permits. The basement is finished, the work is beautiful, and the house is being sold. The home inspector notes that the basement finish is unpermitted. The square footage is excluded from the listing. The buyer demands a price reduction. Permits cost $800 to $1,600. The cost of not having them is measured in lost home value at resale.
- Installing drywall before electrical inspection. The electrician wires the basement. The drywall goes up before the inspector sees the rough-in. The inspector requires the drywall to be removed in specific areas to verify the wiring. The drywall patches are visible forever.
- Using standard drywall instead of moisture-resistant. Standard drywall in a basement absorbs humidity from the air. Within two years, the lower portion of the walls develops a musty smell. Moisture-resistant drywall costs $2 more per sheet and eliminates this problem.
Frequently Asked Questions
What should I do first if I have never done any of this before?
Start with the framing. It is the most forgiving phase. A misplaced stud can be removed and reinstalled in 30 seconds. The skills developed during framing, measuring, cutting, fastening, and checking for plumb and level, transfer directly to every phase that follows. By the time the framing is complete, you will be comfortable with the tools and the workspace. The drywall phase is less forgiving because drywall is heavy, fragile, and the mudding requires a technique that takes a wall or two to develop. Start with the walls that will be least visible, such as a storage room, to develop the drywall skills before tackling the main living area.
When do I absolutely need a second person to help?
Hanging ceiling drywall requires two people minimum. A 4×8 sheet of 5/8-inch drywall weighs 70 pounds. Holding it overhead with one hand while screwing with the other is how backs are injured and drywall is dropped. The drywall lift rented for $30 eliminates the need for a second person but is slower than two people working together. For the rest of the project, framing, insulation, wall drywall, painting, and flooring, one person working alone is sufficient.
How much do I actually save by doing it myself?
A mid-range basement finish costs $30 to $45 per square foot when built by a general contractor. DIY with hired electrical and plumbing costs $15 to $22 per square foot. On an 800-square-foot basement, that is $24,000 to $36,000 for a contractor versus $12,000 to $17,600 for DIY. The savings are $12,000 to $18,000. The cost is 11 to 15 weekends of your time. At an after-tax hourly rate, the savings translate to roughly $50 to $70 per hour of your labor. Whether that is a good trade depends on whether you enjoy the work. If you do, the savings are a bonus. If you do not, the savings may not be worth 15 weekends of your life.
The Basement You Built Yourself
A DIY-finished basement is the largest home improvement project most homeowners will ever attempt. It is also the one where the result is most visible. Every time you walk down the stairs, you are walking into a space that was a concrete box and is now a room. The walls are straight because you leveled each stud. The outlets are where you wanted them. The paint color is the one you chose. The floor is the one you installed. The basement did not exist as living space before you built it. Now it does. That is worth 15 weekends.
Last modified: June 17, 2026