The tub faucet has been dripping for a month. It started as one drop every few seconds, a sound you barely registered. Now it is a steady drip that you hear through the bathroom door at night. The water bill arrived and it was $30 higher than last month. You have been ignoring it because fixing a tub faucet sounds like it involves opening the wall behind the shower. It does not. The repair is done from the front, through the handle opening, with the wall fully intact.
A leaky tub faucet is almost always a worn rubber washer, a failed cartridge, or a degraded O-ring seal. The water is shut off at the main or at an access panel. The handle comes off. The valve stem or cartridge comes out. A $3 rubber part gets replaced. The stem goes back in. The handle goes back on. The water comes back on. The dripping stops. The specific steps depend on whether your tub has a two-handle compression faucet, a single-handle cartridge faucet, or a single-handle ball faucet. This guide covers all three, starting with how to identify which one you have without taking anything apart.
Identify What Type of Tub Faucet You Have
According to master plumber Dave Jones, Regional Vice President at Roto-Rooter and a licensed plumber in three states, the repair procedure depends entirely on the faucet type. There are three types commonly found in tub and shower applications:
- Two-handle compression faucet: separate hot and cold handles. Each handle requires several full rotations to go from off to full on. This is the oldest and most common type in homes built before the 1990s. The fix is replacing the rubber washer at the end of each valve stem.
- Single-handle cartridge faucet: one handle that rotates to control temperature and pulls out or pushes in to control flow. Common brands include Moen, Delta, and American Standard. The fix is replacing the cartridge inside the valve body.
- Single-handle ball faucet: one handle that moves in all directions over a ball-shaped pivot. Primarily used by Delta. The fix is a $20 replacement kit containing the ball, springs, seals, and O-rings.
Ceramic-disk faucets exist in tub applications but are less common. They use two polished ceramic disks that slide against each other. They rarely leak from the disk assembly. When they do, the entire cartridge must be replaced.
| Faucet Type | Handles | How It Feels | Common Brands | Fix Cost |
| Compression | 2 | Multiple turns to open | Generic, old Pfister, Crane | $3-8 (washer + O-ring) |
| Cartridge | 1 | Rotate + push/pull, smooth | Moen, Delta, Kohler, Am. Std. | $15-40 (cartridge) |
| Ball | 1 | Moves freely in all directions | Delta (exclusive) | $20-25 (repair kit) |
Before You Start: Water and Drain
Turn off the water supply. For most tubs, there is no individual shutoff valve like the ones under a sink. You need to shut off the main water supply to the house. If you have an access panel behind the tub, usually in a closet or on the other side of the wall, there may be integral stops on the valve body. These are small slotted screws on either side of the valve that can be turned to shut off water to the tub only. If you do not have integral stops, use the main.
Cover the tub drain with a rag or a drain plug. Small screws and washers have a specific talent for finding the drain opening. Retrieving a brass screw from a P-trap is not how you want to spend the second half of this repair.
Open the faucet briefly after shutting off the water to relieve pressure in the lines. Water will dribble out and then stop. If water continues to flow, the shutoff valve is not fully closed or is faulty. Do not proceed with the repair until the water stops completely.
Fixing a Two-Handle Compression Tub Faucet
Step 1: Remove the Handle
Pry off the decorative cap in the center of the handle with a small flathead screwdriver. Underneath is a Phillips or flathead screw. Remove the screw and pull the handle straight off. If the handle is stuck, which is common on older tub faucets with mineral buildup, use a handle puller tool. Do not pry against the escutcheon plate with a screwdriver. The chrome plate bends and the drywall behind it gouges. A handle puller costs $10 and removes the handle in 30 seconds without damage.
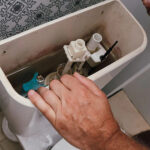
Step 2: Remove the Valve Stem
Behind the handle is the escutcheon plate. Unscrew it or pull it off to expose the valve stem. Use a deep socket wrench, usually 5/8-inch or 3/4-inch, to unscrew the stem retaining nut. Pull the stem straight out. The stem is a long brass rod with a rubber washer at the bottom end and an O-ring higher up on the shaft.
Step 3: Replace the Washer and O-Ring
The rubber washer at the tip of the stem is held in place by a small brass screw. Remove the screw with a Phillips screwdriver. The old washer will be hard, cracked, or grooved. It may have a permanent indentation from years of compression against the valve seat. This is what caused the drip.
Take the old washer and the entire stem to the hardware store. Match the washer exactly. Washers are sized by diameter and thickness, and a washer that is 1/16-inch too small will not seal. Pick up a matching O-ring while you are there. The O-ring seals the stem shaft against the valve body and, if worn, allows water to leak out around the handle when the faucet is running. Coat both the new washer and O-ring with plumber’s grease before installing. Dave Jones specifically recommends this step. Dry rubber grips and tears during reassembly.
Step 4: Reassemble and Test
Push the stem back into the valve body and tighten the retaining nut. Do not overtighten. The nut compresses the O-ring and only needs to be snug. Reinstall the escutcheon, the handle, and the handle screw. Turn the water back on slowly. The first few seconds of flow will spit air. Once the water runs smooth, close the faucet. Watch the spout. If the drip has stopped, the repair is complete. If it still drips, the valve seat inside the faucet body is pitted. A pitted seat will tear a new washer within weeks. Replace the seat with a seat wrench, or use a seat-dressing tool to resurface it without removing it.
Fixing a Single-Handle Cartridge Tub Faucet
Step 1: Remove the Handle
Look for a set screw on the underside or back of the handle. Loosen it with an Allen wrench. On Moen faucets, the handle is held by a small setscrew accessed from the front after removing the decorative cap. Slide the handle off the cartridge stem.
Step 2: Remove and Replace the Cartridge
Behind the handle is a retaining clip. It is a U-shaped brass or plastic piece that holds the cartridge in the valve body. Remove it with needle-nose pliers. Pull the cartridge straight out. It may resist. A cartridge puller tool is available for this purpose and costs $15. Forcing a stuck cartridge with pliers can break the cartridge inside the valve, which turns a quick cartridge swap into a valve body replacement that requires opening the wall.
Take the old cartridge to the hardware store. Moen, Delta, and Kohler each use proprietary cartridges. The wrong cartridge will not fit, and forcing it will damage the valve body. Most manufacturers offer free replacement cartridges under warranty. Call the manufacturer’s customer service line with the model number from your faucet before buying one. The cartridge is free. The labor to replace it is what you are providing.
Insert the new cartridge, reinstall the retaining clip, and replace the handle. Turn the water on. The drip should be gone. If it is not, the valve body itself may be cracked or the new cartridge may be defective. A cracked valve body is rare and is a professional repair.
Fixing a Single-Handle Ball Tub Faucet
Delta ball faucets use a rotating ball mechanism with spring-loaded rubber seals underneath. The repair requires a Delta-specific kit that contains the ball, two springs, two rubber seats, and several O-rings. The kit costs $20 to $25 and includes a small Allen wrench for the handle screw.
Remove the handle by loosening the set screw. Unscrew the domed cap over the ball assembly. Underneath is a cam, a rubber cam washer, and the ball itself. Remove these in order. Use needle-nose pliers to extract the two springs and rubber seats from inside the valve body. Note the orientation: the springs sit under the seats, pushing them upward against the ball. Replace both springs and both seats, even if only one looks worn. The labor to access them is the same either way, and the parts are included in the kit.
Install the new ball, the new cam washer, and the new cam. Reassemble the cap and handle. Turn the water on. The repair is complete when the drip stops and the handle moves smoothly through its full range of motion.
When the Fix Is Not the Washer or Cartridge
If the faucet drips from the tub spout only when the shower is running, the problem is the diverter, not the faucet valve. The diverter is the mechanism that redirects water from the tub spout up to the showerhead. On a spout diverter, pull up the knob on the tub spout. If the spout continues to leak water while the shower runs, replace the tub spout. It unscrews from the pipe and a new one costs $15 to $30.
If water leaks from behind the handle or around the escutcheon plate when the faucet is running, the O-ring on the stem is worn. This is a separate repair from a spout drip. Replace the O-ring and coat the new one with plumber’s grease.
If the faucet drips and the house water pressure is unusually high, above 80 PSI, the pressure is forcing water past seals that are still good. Install a pressure-reducing valve where the main line enters the house. A plumber handles this. It is not a faucet repair.
Frequently Asked Questions
How do I fix a leaky tub faucet if I cannot find a shutoff valve for the tub?
Most tub and shower faucets do not have individual shutoff valves. Shut off the main water supply to the house. The main valve is typically in the basement, crawl space, garage, or near the water meter outside. Turn it clockwise until it stops. Relieve pressure by opening the tub faucet and a lower faucet in the house. If you have integral stops on the valve body, accessible through the trim plate or an access panel behind the tub, use those instead and leave the rest of the house’s water on.
Can I use a universal cartridge instead of buying the brand-specific one?
No. Cartridges are not universal. A Moen cartridge does not fit a Delta valve. A Delta cartridge does not fit a Kohler valve. Using the wrong cartridge will either not fit, will leak immediately, or will damage the valve body. Take the old cartridge with you or identify the faucet brand and model number before buying a replacement.
What if the handle will not come off?
Handles on tub faucets seize from mineral buildup. A handle puller tool threads into the handle and uses a center screw to press against the valve stem, pulling the handle off with controlled force. It costs $10 at the hardware store. Do not pry with a screwdriver. Do not hit the handle with a hammer. Both methods damage the escutcheon plate, the drywall, and sometimes the valve stem itself. The handle puller is the correct tool.
The Quiet Bathroom at Night
A leaky tub faucet is not an emergency. It is a slow erosion of your water bill and your ability to ignore small problems. The fix takes an hour, most of which is the trip to the hardware store to match the washer or cartridge. The actual hands-on work is 20 minutes. The water stops dripping. The bathroom is quiet at night. The $30 on the next water bill goes back into your pocket.
If the faucet drips from both hot and cold handles, repair both sides at the same time. If one washer has failed, the other is the same age and will fail soon. Doing both now saves a second hardware store trip and a second round of shutting off the main water to the entire house.
Last modified: June 17, 2026