The flush handle broke off in your hand on a Tuesday. The plastic arm inside the tank snapped clean at the pivot point, and now the chrome lever is hanging from the side of the toilet like a loose tooth. You have been lifting the tank lid and pulling the chain by hand for three days. It works. It also makes you feel like you are camping indoors.
Replacing a toilet handle is the easiest plumbing repair in the house. It takes ten minutes. It costs eight dollars. The water stays on. The tank stays full. No bucket. No towel. The only tool is a pair of pliers. The only trick is that the mounting nut inside the tank tightens the opposite direction from what you expect. Once you know that, the repair is faster than reading this guide.
Buying the Right Replacement Handle
Toilet handles are either universal or brand-specific. A universal handle costs $6 to $12, fits most toilets made in the last 30 years, and includes the external lever, the internal plastic arm, the mounting nut, and the chain. This is the one to buy unless your toilet is from a brand that uses proprietary hardware.
Handles come in two mounting styles. A side-mount handle attaches to the left or right side of the tank. A front-mount handle attaches to the front face. The two are not interchangeable. Look at your toilet before buying. If the handle is on the side, buy a side-mount handle. If it is on the front, buy a front-mount handle.
Kohler, Toto, and some American Standard models use brand-specific handles that a universal replacement will not fit. If the universal handle wobbles loosely in the mounting hole or the square shaft does not engage, you need the brand-specific part. The toilet model number is stamped inside the tank.
Step 1: Remove the Old Handle
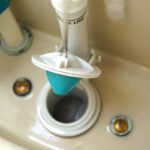
Lift the tank lid and set it on a towel on the floor. The lid is ceramic. It will crack if it tips over onto tile. Look inside the tank. The flush handle passes through the tank wall. On the inside, a plastic nut threads onto the handle’s shaft and holds it in place.
The nut is reverse-threaded. Turn it clockwise to loosen, counterclockwise to tighten. This is backward from every other nut in your house. The reverse thread exists because pushing the handle down to flush would gradually unscrew a standard nut. The reverse thread tightens with use.
Grip the nut with pliers and turn it clockwise. It will spin free after a turn or two. Remove the nut. Pull the old handle out from the outside. Disconnect the chain from the flapper. The old handle assembly, including the internal arm and chain, is now free.
Step 2: Install the New Handle
Slide the new handle into the mounting hole from the outside. The shaft fits through the hole and the flat sides align the handle in the correct orientation. Thread the plastic nut onto the shaft from inside the tank. Turn it counterclockwise to tighten. Hand-tighten, then a quarter turn with pliers. Do not overtighten. The nut is plastic. Overtightening cracks it or cracks the porcelain tank.
Attach the chain from the new handle arm to the flapper. The flapper has a small hole on top for the chain clip. The chain should have about half an inch of slack when the handle is at rest. Too tight, and the chain holds the flapper slightly open. The toilet runs constantly. Too loose, and the handle has excessive free travel before the flapper lifts, or the chain falls under the flapper when it drops and prevents it from sealing.
Adjust the slack by moving the clip to a different link. If the chain is too long even on the shortest link, trim links with wire cutters. If the chain is too short on the longest link, the handle arm is positioned incorrectly. Loosen the set screw on the arm, rotate the arm slightly downward, and retighten.
Step 3: Test and Adjust
Replace the tank lid. Flush the toilet. The handle should move smoothly without sticking and return to its rest position on its own. The flapper should lift fully for a complete flush and drop back down cleanly. Listen after the tank refills. Silence means the flapper is sealed and the chain is not holding it open.
If the handle sticks in the down position, the arm inside the tank is binding against the tank wall. Open the tank and watch the arm as you press the handle. Adjust the arm position by loosening the set screw, rotating the arm away from the wall, and retightening. If the toilet runs continuously after the new handle is installed, the chain is too tight. Give it more slack. If the flush is weak, the chain has too much slack and the flapper is not lifting fully. Shorten the chain.
Universal vs. Brand-Specific Handles: How to Tell the Difference
The mounting shaft on a universal handle is typically square or hexagonal with flat sides. It fits through a round or square hole in the tank and the flats prevent the handle from rotating loosely. A brand-specific handle, particularly on Kohler and Toto toilets, may have a proprietary shaft shape that only fits the matching tank hole. If you bring the old handle to the hardware store and the universal replacement does not match the shaft shape, you need the brand-specific part.
Toilet model numbers are stamped inside the tank above the water line. Kohler numbers start with K-, Toto with CST or ST, American Standard with a four-digit number. Give this number to the plumbing supply counter person and they will pull the correct handle in under a minute. The brand-specific handle costs $15 to $30, which is more than the universal but less than the frustration of installing the wrong part and having to take it back.
When the Handle Is Not the Problem
If the old handle broke because the toilet requires excessive force to flush, the handle was not the cause. It was the symptom. The flapper is stiff, the chain is rusted, or the flush valve is failing. Replacing only the handle in this situation means the new handle will also fail, just not immediately.
After installing the new handle, flush the toilet. If the handle requires more than light finger pressure to operate, something inside the tank is binding. Inspect the flapper. It should lift easily. Inspect the chain. It should move freely without catching. If the flush valve itself is sticking, the handle cannot fix it. Replace the flapper or, if necessary, the flush valve.
Frequently Asked Questions
Why is the toilet handle nut reverse-threaded?
Pushing the handle down to flush applies a rotational force. On a standard right-hand thread, that force would gradually unscrew the nut over thousands of flushes. The reverse thread means the downward push tightens the nut rather than loosening it. The nut stays tight for the life of the handle. When removing it, turn clockwise.
Can I convert a side-mount handle to a front-mount handle?
No. The mounting hole is drilled through a specific wall of the tank at the factory. A side-mount handle cannot be installed in a front-mount tank because the hole does not exist in the front wall, and vice versa. The only way to change the handle position is to replace the entire toilet tank, which is not practical. Buy the handle that matches your existing mounting position.
The new handle is loose even after tightening the nut. How do I fix it?
The mounting hole in the tank may be oversized, or the new handle’s shaft is slightly undersized for the hole. Some universal handles include spacer washers to adapt to different tank hole sizes. If the kit did not include them, install a rubber washer between the external handle and the outside of the tank. The washer fills the gap and prevents the handle from wobbling. A hardware store sells individual rubber washers for less than a dollar.
The Ten-Minute Fix
A broken toilet handle is the repair equivalent of a burned-out lightbulb. It is small, it is obvious, and it is easy to ignore because the toilet still works if you reach inside the tank. After a week of manual flushing, the tank lid sits crooked because you stopped replacing it properly, and the whole bathroom feels slightly broken. The new handle costs eight dollars. The repair takes ten minutes. The reverse-threaded nut is the only thing that makes it take ten minutes instead of five.
Last modified: June 18, 2026