Learning how to replace a flapper on toilet is usually a 10-minute repair, but only if you buy the right flapper, clean the valve seat, and leave enough slack in the chain, shares RentWise Property Company Springfield. The job is simple. The small details decide whether the toilet actually stops running.
A worn flapper is the rubber seal at the bottom of the tank. When it warps, cracks, gets slimy, or no longer lands flat, water leaks from the tank into the bowl and the fill valve keeps topping the tank back up.
That is why how to replace a flapper on toilet is less about strength and more about sequence. Turn off the water, match the part, clean the seat, and leave the chain loose enough to let the rubber close.
Quick Answer: Replace the Flapper in the Right Order
Turn off the toilet’s water supply, flush to empty the tank, unhook the chain, remove the old flapper, clean the flush valve seat, attach the matching new flapper, reconnect the chain with slight slack, then refill and test.
- Turn the shutoff valve clockwise until it stops.
- Flush the toilet and hold the handle down to drain most of the tank.
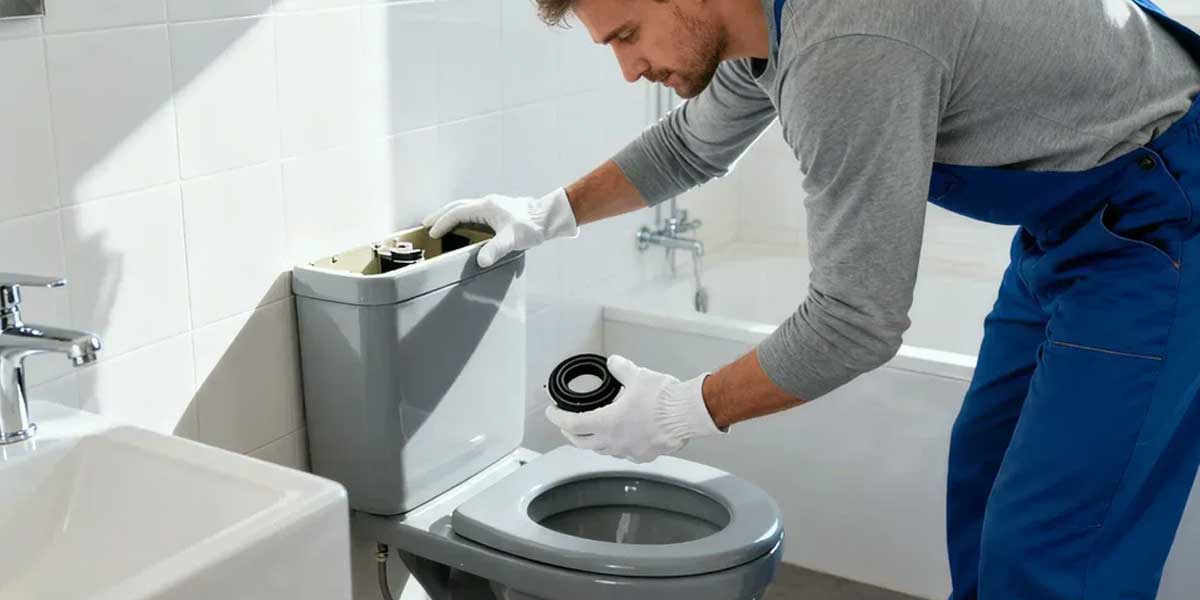
- Lift the tank lid and place it flat on a towel, not upright against a wall.
- Take a picture of the old flapper and chain before removing anything.
- Unclip the chain from the flush lever arm.
- Slide or unhook the flapper ears from the overflow tube posts.
- Wipe the flush valve seat until it feels smooth.
- Install the new flapper on the same posts or mounting ring.
- Reconnect the chain with about 1/4 to 1/2 inch of slack.
- Turn the water back on, flush several times, and watch for leaks.
The Pinellas County Utilities flapper guide uses the same basic sequence: shut off water, flush, remove the chain, remove the old flapper, install the new one, and test the seal.
That order matters because a toilet tank looks forgiving until the chain catches under the flapper or the new rubber lands on mineral grit. Then the toilet refills every few minutes and the whole repair feels suspiciously cursed.
Tools and Parts You Need Before You Start
You usually need only a replacement flapper, a towel, rubber gloves, and a sponge or soft cloth. Bring the old flapper or a clear photo to the store if you are not sure about the size or style.
| Item | Why it helps | Can you skip it? |
|---|---|---|
| Replacement flapper | Creates the seal between the tank and bowl | No |
| Towel | Protects the tank lid and catches drips | No, unless you enjoy porcelain panic |
| Sponge or soft cloth | Cleans slime and mineral buildup from the valve seat | Only if the seat is already spotless |
| Rubber gloves | Keeps old tank residue off your hands | Yes |
| Phone photo | Helps match chain position, flapper type, and size | Not wise on a first repair |
Most replacement flappers cost only a few dollars to around $20, depending on brand, size, and adjustable settings. If the toilet is a specialty model, the factory replacement part may be the least annoying option.
The tank water should be clean supply water, but the bottom of the tank often has a slick film and rusty-looking sediment. It is normal. It is also why the towel and gloves feel less optional once the lid is off.
Choose the Right Flapper Before Removing the Old One
Match the flapper by flush valve size, mounting style, and toilet type before you install anything. A universal flapper works on many toilets, but some toilets need a model-specific or adjustable flapper to seal and flush correctly.
2-Inch vs 3-Inch Flapper
Most older or standard toilets use a 2-inch flapper, while many newer high-efficiency toilets use a 3-inch flapper. Measure the opening at the bottom of the tank or compare the old flapper to the new package.
If the opening looks about the size of a baseball, it is usually 2 inches. If it looks closer to a softball, it is usually 3 inches.
Mounting Style
Many flappers have two rubber ears that hook onto pegs on the overflow tube. Others use a ring that slides over the overflow tube, especially on older flush valve designs.
Do not force a ring-style flapper over a tube that has side pegs unless the package says to cut the ring off. That little instruction is easy to miss, and it can make a good flapper sit crooked.
Adjustable vs Fixed Flapper
An adjustable flapper lets you control how long it stays open during the flush. A fixed flapper is simpler, but it may waste water or create a weak flush if it is not matched to the toilet.
The U.S. Environmental Protection Agency’s WaterSense toilet guidance notes that toilets account for a major share of indoor residential water use, so a running toilet is more than a background noise problem.
“Some toilets don’t work well with universal replacement parts. Toto is a big one. Buy actual factory replacement parts.”
– r/handyman, February 2026 (6 upvotes)
The Actual Flapper Swap, From Shutoff to Test Flush
The safest method is to copy the old setup, clean the sealing surface, then adjust the chain only after the tank refills. Rushing the chain adjustment is the most common reason a new flapper still leaks or gives a weak flush.
1. Turn Off the Water
Find the shutoff valve on the wall or floor behind the toilet and turn it clockwise. If the valve is stiff, use gentle hand pressure rather than a wrench, because old shutoff valves can start leaking when they are bullied.
If the valve will not close or starts dripping, pause the flapper repair and deal with the valve first. Replacing a flapper without shutting off water is possible in a technical sense, but it turns a tidy job into a wet little race.
2. Flush and Drain the Tank
Flush once and hold the handle down until the water level drops as low as it will go. Sponge out the remaining water if you want a cleaner workspace.
The tank does not need to be bone dry. You only need the water low enough that your hands can work around the flapper without pushing water over the rim.
3. Disconnect the Chain
Unclip the chain from the flush lever arm, but notice which hole it used. If the chain had been working well before the flapper failed, that hole is a useful starting point.
A chain that is too tight holds the flapper slightly open. A chain that is too loose may not lift the flapper high enough for a full flush.
4. Remove the Old Flapper
Pull the flapper ears off the side pegs, or slide the ring up and off the overflow tube. Old rubber can feel gummy, stiff, or crumbly, so do not be surprised if it leaves a dark mark on your fingers.
Check the old flapper for a brand name, size marking, or printed part number. That tiny text can save a second trip to the hardware aisle.
5. Clean the Flush Valve Seat
Wipe the round plastic seat where the flapper lands. Feel for mineral buildup, grit, old rubber residue, or a rough edge that could stop the new flapper from sealing.
“Turn off the water valve, remove the flapper, and clean the drain area to the bowl. That part has been under water since the toilet was installed and can get covered in enough crud to prevent a good flapper seal.”
– r/handyman, February 2026 (7 upvotes)
This is the step people skip when they are tired. It is also the step that makes a $7 part behave like a repair instead of a decoration.
6. Install the New Flapper
Attach the new flapper ears to the overflow tube pegs, or slide the ring over the tube if that is the correct style. The flapper should move freely and settle flat over the opening without twisting.
If the flapper has a float, dial, or numbered setting, start with the package recommendation for your toilet type. You can fine-tune after the first few test flushes.
7. Reconnect and Adjust the Chain
Reconnect the chain to the lever arm with about 1/4 to 1/2 inch of slack when the handle is at rest. The chain should lift the flapper promptly when you press the handle, then let it fall fully closed.
Do one slow handle press with the tank still open. Watch the chain, because it can kink, snag on the lever arm, or slide under the flapper at exactly the wrong moment.
8. Refill the Tank and Test
Turn the water supply back on and let the tank refill. Flush three or four times while watching the flapper drop, the chain relax, and the water level stop below the top of the overflow tube.
Add a few drops of food coloring to the tank and wait about 10 to 15 minutes without flushing. If color appears in the bowl, the flapper is still leaking.
Set the Chain Slack Correctly
The chain should be loose enough that the flapper rests flat, but tight enough that the handle lifts it without a long delay. Most problems after a flapper replacement come from the chain, not the rubber part itself.
| Symptom | Likely chain issue | Fix |
|---|---|---|
| Toilet runs constantly | Chain too tight or caught under flapper | Move the clip one hole looser and check for snags |
| Weak flush | Chain too loose | Shorten the chain slightly |
| Handle jiggles before flushing | Too much slack | Remove one or two chain links from the slack |
| Flapper closes too fast | Wrong flapper setting or poor part match | Adjust the flapper dial or use the toilet’s recommended part |
Oddly enough, the best chain setting usually looks slightly loose. A perfectly taut chain looks tidy, then quietly holds the flapper open.
If the Toilet Still Runs After Replacing the Flapper
If the toilet still runs, check the chain, valve seat, flapper size, water level, and flush valve condition before replacing more parts. A new flapper cannot seal a cracked seat or compensate for a mismatched design.
Check the Seat Again
Run your fingertip around the flush valve seat. If you feel a nick, a calcium ridge, or a warped edge, the flapper may be fine but the surface below it is not.
Do not sand aggressively inside the tank. A soft cloth or non-scratch pad is safer for ordinary buildup.
Check the Water Level
The water level should stop below the top of the overflow tube. If water spills into that tube, the fill valve or float setting is causing the running, not the flapper.
This distinction saves time. A flapper leak sends water into the bowl through the flush valve, while an overfilled tank sends water into the overflow tube.
Check the Flapper Match
A 3-inch opening with a 2-inch flapper will not seal. A universal flapper on a toilet that needs a factory part may seal badly or close at the wrong speed.
One Reddit user described trying multiple flappers while the toilet kept running every 10 minutes. That kind of pattern usually means the issue is fit, chain tension, seat condition, or another tank part, not bad luck with every new flapper.
Check the Handle and Lever Arm
A corroded handle can stick slightly after the flush. When that happens, the chain never fully relaxes and the flapper cannot sit flat.
Press and release the handle while watching inside the tank. If the lever arm returns slowly, fix that before blaming the new flapper.
When a Flapper Replacement Is Not Enough
Call a plumber or replace additional tank parts if the shutoff valve leaks, the flush valve seat is damaged, the overflow tube is cracked, or the toilet uses a specialty system you cannot match confidently.
- The shutoff valve drips or will not close.
- The flush valve seat is cracked, pitted, or warped.
- The overflow tube has a visible crack.
- The toilet has a canister-style flush valve rather than a simple flapper.
- The toilet keeps running after the dye test, chain adjustment, and seat cleaning.
- The tank bolts or supply line start leaking while you work.
There is no prize for turning a $10 repair into a soaked bathroom floor. If the porcelain, shutoff valve, or flush valve assembly is the real problem, the flapper has already done its diagnostic job.
How Long a Toilet Flapper Lasts
A toilet flapper often lasts several years, but chlorine tablets, hard water, mineral buildup, and heavy use can shorten its life. Replace it when the toilet runs, ghost flushes, or fails a dye test.
Avoid dropping harsh cleaning tablets directly into the tank unless the toilet manufacturer approves them. Chemicals that sit in the tank can age rubber parts faster, especially the flapper and seals.
Once or twice a year, lift the tank lid and listen after a flush. The repair is easier when you catch a slow leak early, before the water bill makes the announcement for you.
FAQ
Can I replace a toilet flapper myself?
Yes, most homeowners can replace a toilet flapper themselves in about 10 to 20 minutes. If you are learning how to replace a flapper on toilet for the first time, the job does not require plumbing experience if the shutoff valve works and the toilet uses a standard flapper.
Do I need to turn off the water to replace a toilet flapper?
Yes, turn off the water before replacing the flapper. It keeps the tank from refilling while you work and makes it easier to test the new seal without rushing.
How do I know what size toilet flapper I need?
Measure the flush valve opening or compare the old flapper at the store. Most common sizes are 2-inch and 3-inch, and the package usually lists compatible toilet types.
Why is my toilet still running after I replaced the flapper?
The toilet may still run because the chain is too tight, the valve seat is dirty, the flapper is the wrong size, the water level is too high, or another tank part is worn.
Can I use a universal toilet flapper?
A universal flapper works on many standard toilets, but it is not guaranteed for every model. If the toilet has a specialty flush system or a known brand-specific part, use the recommended replacement.
Final Check Before You Put the Lid Back
Flush several times, wait for the tank to stop filling, and listen for silence. A good flapper replacement ends with a quiet tank, a relaxed chain, and no colored water leaking into the bowl during a dye test.
The repair is small, but it teaches a useful rule about toilets: rubber parts are cheap, fit matters, and clean contact surfaces solve more problems than force.
Last modified: May 20, 2026