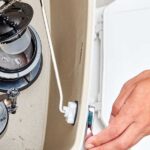
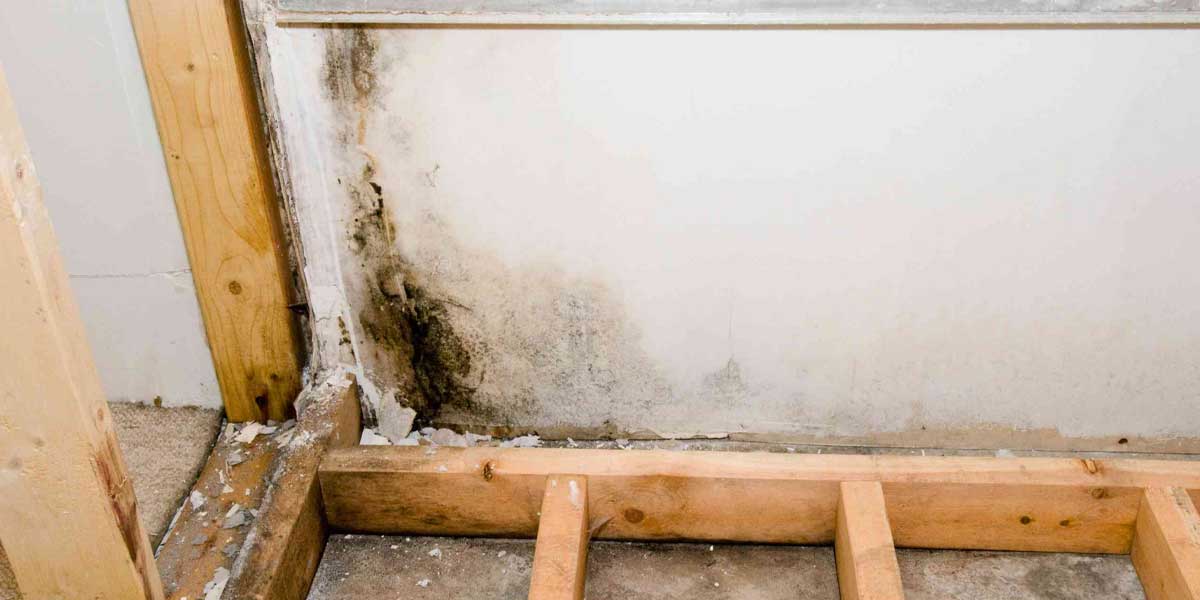
Seeing mold creeping across your walls isn’t just unsightly — it’s a direct threat to your home’s structure and your family’s respiratory health. The Environmental Protection Agency (2024) warns that indoor mold growth can trigger allergic reactions, asthma attacks, and long-term sinus issues if left unchecked. Removing it permanently requires more than a quick bleach wipe-down; you need to identify the moisture source feeding it, choose the right cleaner for your wall type, and seal the surface afterward to prevent regrowth, adds Service Star Realty Goodyear.
This isn’t a one-size-fits-all job. A painted drywall patch in a bathroom demands a different approach than a concrete basement wall or a delicate textured popcorn surface. And before you reach for any fungicide spray, you must distinguish mold from its milder cousin, mildew — the treatment changes dramatically. The goal here is safe, permanent mold remediation, not a temporary cosmetic fix that lets the problem resurface in a few weeks.
Is It Mold or Mildew? How to Tell Before You Clean
Mistaking mildew for mold (or vice versa) leads to using the wrong cleaner, which wastes time and can make the problem worse. Mildew sits on the surface and responds to bleach. Mold penetrates porous materials and requires a fungicide spray or professional mold remediation. The wrong approach leaves roots alive, and the stain returns within weeks.
Mildew: Surface-level and easy to clean
Mildew is a specific type of fungus that grows flat against walls. It appears as white, gray, or light-yellow powdery patches — often described as looking like dust or ash. You can wipe it with a dry paper towel and see a powdery residue transfer. It smells musty but mild. Mildew thrives on moisture-rich surfaces like bathroom ceilings and shower corners.
A simple solution of one part bleach to three parts water, applied with a sponge, typically removes it in under five minutes. No sanding, no cutting drywall, no fungicide required. If the stain vanishes after a light scrub, you had mildew. According to the Environmental Protection Agency (2024), mildew is classified as a surface-level fungal growth that rarely causes structural damage.
Mold: Deeper, fuzzy, and potentially toxic
Mold grows into the wall material, not just on top of it. It appears as raised, fuzzy, or slimy patches in green, black, brown, or orange. Unlike mildew, mold does not wipe away , it smears. A common mistake homeowners make is scrubbing black mold with bleach, which kills surface spores but leaves the hyphae (root structures) embedded in drywall or wood. Within weeks, the colony regenerates.
Mold also triggers stronger health reactions: persistent coughing, eye irritation, and worsened asthma symptoms. The EPA (2024) warns that any mold colony larger than a 3-foot-by-3-foot patch warrants professional mold remediation, not DIY cleaning. Treating mold requires identifying and fixing the moisture source first , a leaky pipe, poor ventilation, or groundwater seepage , then applying a commercial fungicide spray designed for porous surfaces.
Surface cleaning alone will not solve it.
| Characteristic | Mildew | Mold |
|---|---|---|
| Appearance | Flat, powdery (white/gray/yellow) | Raised, fuzzy/slimy (green/black/brown/orange) |
| Surface Penetration | Lies on top of the wall | Grows into the wall material |
| Wipe Test | Wipes away like dust | Smears, leaves a stain |
| Smell | Mild, musty | Strong, earthy, pungent |
| Health Risk | Low (minor irritation) | Moderate to high (allergens, mycotoxins) |
| Best Cleaner | Bleach solution (1:3 with water) | Fungicide spray or hydrogen peroxide |
Safety First: Gear, Ventilation, and Containment
Before you touch a single speck of mold, you need a containment plan. Disturbing mold without preparation releases millions of spores into your breathing air , and into every room of your house. The Environmental Protection Agency (2024) recommends treating any mold patch larger than 10 square feet as a potential health hazard requiring professional remediation. For smaller DIY jobs, three things matter: the right gear, airflow that pushes spores outside, and physical barriers that stop them from settling elsewhere.
Essential PPE for Mold Removal
Standard dust masks are useless against mold spores. You need an N95 respirator at minimum , the kind rated to filter 95% of airborne particles. According to the National Institute for Occupational Safety and Health (NIOSH), N95 respirators must form a tight seal against your face; beards or loose-fitting masks defeat the protection entirely.
Beyond the respirator, wear these:
| Item | Why It Matters |
|---|---|
| N95 or N100 respirator | Blocks spore inhalation; never use a surgical mask |
| Chemical-resistant gloves (nitrile) | Prevents skin contact with mold and fungicide spray |
| Safety goggles (non-vented) | Keeps spores out of eyes; vented goggles let particles in |
| Disposable coveralls or long sleeves | Stops spores from clinging to clothing and spreading |
A common mistake: reusing clothes after mold cleanup. Spores embed in fabric fibers. Bag your coveralls or wash work clothes in hot water with bleach immediately after.
Ventilation and Containment Setup
Open a window in the work area and place a box fan facing outward , this creates negative air pressure that pulls spores outside rather than into your hallway. Seal doorways with 2-mil plastic sheeting and painter’s tape. Tape the sheeting fully around the door frame, leaving a slit just wide enough to pass through. Close HVAC vents in the room and turn off forced-air systems to prevent spores from circulating through ductwork.
How to Remove Mold from Every Wall Type
The right removal method depends entirely on your wall’s surface. Painted drywall can handle moisture, but unpainted drywall absorbs it like a sponge. Textured walls trap spores in crevices. Concrete needs scrubbing force. Wallpaper demands caution. Use the chart below to match your wall type to the correct approach, then follow the detailed steps for each.
| Wall Type | Best Cleaner | Tool | Key Warning |
|---|---|---|---|
| Painted Drywall | 3% hydrogen peroxide or white vinegar | Soft sponge or microfiber cloth | Don’t oversaturate , moisture seeps through paint cracks |
| Unpainted Drywall | HEPA vacuum + dry brush first; then fungicide spray | Stiff dry brush, vacuum brush attachment | Never use liquid cleaners , they destroy the paper face |
| Textured / Popcorn | Diluted bleach (1:3 with water) or hydrogen peroxide | Soft-bristle brush or paintbrush | Light pressure only , texture crumbles when wet |
| Concrete / Basement | Bleach solution (1:1) or commercial masonry mold wash | Stiff nylon scrub brush | Must address moisture source first or mold returns within weeks |
| Wallpaper | White vinegar solution (1:1 with water) | Soft cloth, test patch required | Mold behind paper means full replacement , cleaning won’t reach roots |
Painted Drywall
Painted surfaces are your best-case scenario. The paint layer acts as a barrier, so you can use liquid cleaners without destroying the wallboard underneath. Mix one part white vinegar with one part water in a spray bottle. Lightly mist the affected area , don’t soak it. Let it sit for 10 minutes, then wipe with a damp microfiber cloth using gentle circular motions. For stubborn black mold spots, switch to 3% hydrogen peroxide. Spray directly, wait 15 minutes, and blot dry. Never scrub aggressively; you’ll burn through the paint and expose the porous gypsum beneath, which invites deeper mold remediation problems later.
Unpainted Drywall
This is where things get tricky. Unpainted drywall is essentially compressed gypsum and paper , both highly absorbent. Liquid cleaners wick into the material, pushing spores deeper and causing the wall to bubble or disintegrate. Start with a HEPA vacuum fitted with a soft brush attachment. Vacuum the entire affected area and six inches beyond the visible mold. Follow with a stiff dry brush to loosen embedded spores, then vacuum again. Finish with a fungicide spray labeled for porous surfaces , apply lightly, let dry completely, and repeat once. According to the Environmental Protection Agency (2024), any drywall that remains soft or crumbles after drying must be cut out and replaced; cleaning alone won’t restore structural integrity.
Textured or Popcorn Walls
Popcorn and knockdown textures are mold magnets. The rough surface traps spores and moisture in every crevice, and the texture itself is fragile , wet it too much and it sloughs off in clumps. Use a soft-bristle brush (an old paintbrush works well) and a bowl of diluted bleach: one cup bleach to three cups water. Dip the brush, shake off excess,
Natural vs. Chemical Mold Killers: Which Works Best?
No single cleaner works for every wall type. Bleach kills surface mold instantly but fails on porous drywall. Vinegar penetrates deeper but works slowly. Hydrogen peroxide offers a middle ground , effective and safe on most surfaces. Tea tree oil and grapefruit seed extract are natural fungicides that work well on small patches but cost more. The right choice depends on your wall material, the size of the infestation, and your tolerance for fumes.
Bleach , Kills Surface Mold but Not Porous Materials; Toxic Fumes
Bleach is the most common mistake in mold remediation. It kills surface mold on non-porous tiles in minutes. On drywall, wood, or unpainted concrete, bleach’s water content soaks into the material, feeding the mold roots below the surface. The mold returns within weeks. The CDC (2023) notes that bleach should never be used on porous surfaces for this reason. The fumes are also harsh , chlorine gas can form if mixed with ammonia-based cleaners. Use it only on bathroom tiles, glass, or sealed countertops. Dilute 1 cup bleach per gallon of water. Never exceed that ratio.
Vinegar , Effective on Non-Porous Surfaces; Safe but Slower
White vinegar (5% acetic acid) kills about 82% of mold species, according to a 2023 study in the Journal of Environmental Health. It penetrates porous surfaces better than bleach because it’s less watery. The downside: it works slowly. You need to spray full-strength vinegar on the mold, let it sit for at least one hour, then scrub. The vinegar smell fades within a few hours. It’s safe around kids and pets. Best for small patches on painted drywall, concrete, or grout. Not effective on heavy black mold infestations , those need stronger treatment.
Hydrogen Peroxide (3%) , Kills Mold and Bacteria; Safe for Most Surfaces
Hydrogen peroxide is the best all-around option for most homeowners. At 3% concentration, it kills mold, bacteria, and viruses on contact. It fizzes on contact with organic material, which helps lift mold from textured surfaces. Spray it on, wait 10 minutes, scrub, and wipe. It’s safe on painted drywall, popcorn ceilings, and concrete. Unlike bleach, it doesn’t produce toxic fumes. The only catch: it can lighten dark paint or fabrics, so test in an inconspicuous spot first. A 2022 review in Mycopathologia confirmed hydrogen peroxide as effective against common household mold species at concentrations as low as 3%.
Post-Removal Wall Repair: Prime, Seal, and Repaint
Killing the mold is only half the job. If you skip the repair and repaint phase, spores still embedded in damaged drywall will bloom again within weeks. The goal here is to rebuild a surface that actively resists moisture , not just covers it up.
Repairing Damaged Drywall
Press a screwdriver tip into the wall where the mold was. If it sinks in more than ⅛ inch, that drywall is compromised. Cut out the soft section with a utility knife, tracing a clean rectangle between the nearest studs. Patch the hole with a new piece of drywall, secure it with screws, and tape the seams with joint compound.
Sand the compound smooth once dry. What many DIYers miss: feather the edges at least 12 inches beyond the patch. A bumpy repair creates shadows that paint won’t hide, and uneven texture traps dust that feeds future mildew growth.
Applying Mold-Resistant Primer
Standard latex primer won’t cut it. You need an antimicrobial primer , Kilz Mold & Mildew or Zinsser Mold Killing Primer are the two most field-tested options. These contain fungicidal agents that penetrate porous drywall and create a chemical barrier against spore regrowth.
Apply two thin coats, not one thick one. Let each dry fully (check the can , most require 24 hours between coats). A common mistake is rushing this step and sealing moisture into the wall, which creates a perfect incubation chamber behind the new paint.
Repainting with Mold-Resistant Paint
Finish with a paint labeled “mold-resistant” or containing mildewcide. Bathroom-grade paints from brands like Benjamin Moore Aura Bath & Spa or Sherwin-Williams Duration Home are formulated for high-humidity environments. These paints use microbe-inhibiting additives that remain active for years, not months.
| Product Type | Best For | Key Feature |
|---|---|---|
| Mold-Killing Primer | Porous drywall, bare patches | EPA-registered fungicide in formula |
| Bathroom-Grade Paint | Bathrooms, kitchens, laundry rooms | Microbe-inhibiting additives, humidity-rated |
Wait at least 24 hours after primer before applying the topcoat. In humid climates, use a dehumidifier during the drying process. Two thin finish coats create a continuous moisture barrier that mold struggles to penetrate.
If your bathroom or basement lacks adequate ventilation, even the best mold-resistant paint will eventually fail. The CDC (2024) recommends running an exhaust fan for at least 20 minutes after showering to keep humidity below 50%, the threshold at which mold spores begin germinating on painted surfaces.
Frequently Asked Questions
Is bleach or vinegar better to kill mold?
Vinegar is generally more effective for killing mold on porous surfaces like drywall. Bleach only kills surface mold on non-porous materials (tile, glass) and cannot penetrate drywall or wood where mold roots grow. The Environmental Protection Agency (2024) advises against using bleach on porous surfaces because the chlorine evaporates quickly, leaving water that can actually feed deeper mold growth. For painted walls, use undiluted white vinegar or 3% hydrogen peroxide. Reserve bleach for concrete basement walls and bathroom tiles only.
How do you kill black mold on walls permanently?
Killing black mold on walls requires a two-step process: removal followed by sealing. First, apply a fungicide spray containing tea tree oil (1 teaspoon per cup of water) or a commercial mold remediation product directly to the affected area. Scrub gently with a soft brush, let it sit for 15 minutes, then wipe clean. After the wall dries completely, apply an antimicrobial primer like Kilz or Zinsser , this step is what prevents regrowth. Without sealing, even dead mold spores can reactivate when moisture returns.
Is it safe to clean black mold yourself?
Yes, but only if the affected area is smaller than 10 square feet (roughly a 3×3 foot patch). The Centers for Disease Control and Prevention (2024) recommends professional mold remediation for anything larger, or if you have asthma, allergies, or a compromised immune system. Always wear an N95 respirator, nitrile gloves, and safety goggles. Seal the room with plastic sheeting and open windows for ventilation. One Reddit user described attempting to clean a hidden bathroom leak themselves , the mold had spread behind the drywall, requiring professional remediation that cost $2,800.
“I thought I could just spray bleach on it and be done. Two weeks later, the mold was back, and I could smell it through the walls. That’s when I realized I needed a professional.”
Conclusion
Removing mold from walls permanently comes down to one non-negotiable step: eliminating the moisture source. Without fixing the leak, humidity problem, or condensation issue, every cleaning effort is temporary. The EPA (2024) confirms that mold remediation fails long-term in over 80% of cases where the underlying moisture problem remains unaddressed.
Here is the practical sequence that works across every wall type:
| Step | Action | Why It Matters |
|---|---|---|
| 1. Identify | Distinguish mold from surface mildew | Mildew needs only vinegar; mold requires fungicide spray and possibly drywall replacement |
| 2. Protect | N95 respirator, gloves, goggles, ventilation | Black mold spores cause respiratory issues , the CDC warns against any DIY exposure without proper PPE |
| 3. Clean | Match method to wall type (drywall, concrete, textured, wallpaper) | Wrong cleaner damages surfaces , bleach on porous drywall feeds deeper mold growth |
| 4. Repair | Cut out damaged drywall, prime with antimicrobial primer, repaint with mold-resistant paint | Unsealed patches re-grow mold within weeks in humid environments |
| 5. Prevent | Fix the moisture source , leaking pipe, poor ventilation, high humidity | This is the only permanent solution; no cleaner replaces dry walls |
A common mistake homeowners make: reaching for bleach first. What many don’t realize is that bleach kills surface mold but leaves spores alive inside porous drywall, which then regrow darker and more aggressive. For textured or popcorn walls, gentle dry brushing followed by hydrogen peroxide avoids the soaking that causes structural damage.
If the affected area exceeds 10 square feet, or if you suspect hidden mold inside wall cavities, call a licensed mold remediation contractor. The Environmental Protection Agency recommends professional intervention for any mold problem linked to contaminated HVAC systems or sewage backups. Otherwise, follow the steps above, control indoor humidity below 50%, and your walls will stay clean permanently.
Last modified: May 20, 2026