The garage is a concrete box with exposed studs, a bare lightbulb, and a floor that has absorbed 15 years of oil drips, road salt, and whatever leaked from the car that one time. It functions as a garage. The cars fit. The garbage cans live along the back wall. The shelves hold paint cans that have not been opened since the previous owner left them. But the garage could be more than a weatherproof parking spot. Remodeling a garage means upgrading it while keeping it a garage. The cars still park inside. The floor gets coated. The walls get finished. The lighting gets upgraded. The storage gets organized. The garage becomes a space that works for parking, projects, and everything else a garage is asked to do.
According to wikiHow’s home finishing guide, finishing an existing space requires a systematic approach to the building envelope, utilities, and finishes. A garage remodel follows the same sequence with the added elements of durable flooring, heavy-duty storage, and task-specific lighting. This guide covers the full remodel from floor to ceiling.
Phase 1: The Floor — Epoxy, Tile, or Mats
The garage floor is the largest continuous surface in the room and the one that takes the most abuse. A bare concrete floor is porous, stains permanently, and produces dust as the surface erodes. The floor remodel starts with cleaning and ends with a durable coating.
Clean the concrete first. Degrease oil stains. Scrub the entire floor with a concrete cleaner or TSP. Etch the surface with an acid etching solution, which opens the concrete pores so the coating can bond. Rinse thoroughly and let the floor dry completely. A concrete moisture test, a 2-foot square of plastic taped down for 48 hours, confirms the slab is dry enough for coating. Condensation under the plastic means the concrete is transmitting moisture that will cause the coating to delaminate.
Epoxy floor coating is the standard garage floor finish. It chemically bonds to the concrete, resists oil, gasoline, and road salt, and lasts 5 to 10 years under vehicle traffic. A two-part epoxy kit for a two-car garage costs $100 to $200. The installation takes two days. Day one: clean, etch, rinse, dry. Day two: apply epoxy with a roller, broadcast color flakes for texture and grip, let cure. The floor cannot be walked on for 24 hours and cannot support vehicles for 72 hours. The result is a glossy, seamless surface that wipes clean with a damp mop.
Interlocking garage tiles are an alternative to epoxy. Rigid PVC or polypropylene tiles snap together over the concrete. They require no surface preparation beyond sweeping. They can be installed in an afternoon and walked on immediately. Individual tiles can be replaced if damaged. The cost is $2 to $4 per square foot, or $800 to $1,600 for a two-car garage. The tiles are more expensive than epoxy but install faster, require no curing time, and can be taken up and moved to a new house.
Rubber gym mats in a section of the garage designated for exercise protect the concrete from dropped weights and provide a non-slip workout surface. The mats are 3/8-inch to 3/4-inch thick, cost $1 to $3 per square foot, and are not a whole-floor solution. They are a zone within the garage where the floor treatment matches the activity.
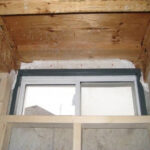
Phase 2: The Walls — Drywall, Pegboard, or Slatwall
Garage walls do not need to be finished to the same standard as living space walls, but exposed studs collect dust, spider webs, and make the garage feel permanently under construction. The wall treatment depends on how the garage will be used.
Drywall is the most finished option. It makes the garage brighter by reflecting light, provides a surface for paint, and gives the space a clean, finished look. Use moisture-resistant drywall for the bottom 4 feet of the walls where snow melt and rain splash concentrate. Standard drywall above. Tape the seams with at least two coats of compound. The finish does not need to be Level 4 smooth, but the seams should be covered and sanded. Paint the walls with a satin or semi-gloss latex that can be wiped clean. The total material cost for drywall on three walls of a two-car garage is $400 to $700 for materials if doing it yourself.
Slatwall or pegboard on one wall converts vertical space into organized storage. Slatwall panels are grooved horizontal panels that accept hooks, baskets, and shelves that can be rearranged without tools. A 4-foot by 8-foot slatwall panel costs $80 to $120. Two panels cover an 8-foot by 8-foot section and provide a flexible storage wall for tools, sports equipment, and garden supplies. Pegboard is the less expensive alternative at $20 to $30 per 4×8 sheet. It is more limited in weight capacity and accessory options than slatwall, but it is adequate for lightweight items and hand tools.
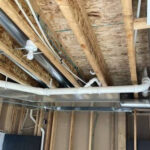
Phase 3: The Ceiling — Drywall, Drop Ceiling, or Open Joists
The garage ceiling is exposed joists with wiring, ductwork, and possibly the floor of a room above. The ceiling treatment is a tradeoff between access and appearance.
Drywalling the ceiling creates a finished look and provides a fire separation between the garage and the space above, which is required by code for attached garages with living space above. Use 5/8-inch Type X fire-rated drywall. The installation requires a drywall lift or a second person. The ceiling drywall cost for a two-car garage is $300 to $500 in materials. The ceiling drywall is the most physically demanding part of the remodel because the sheets are heavy and overhead work is exhausting.
Painting the exposed joists flat black is a faster, less expensive alternative. The black makes the joists visually recede. The wiring and ductwork blend into the dark background. The ceiling height is preserved. Access to the mechanicals above remains open. The cost is $60 to $120 for paint and primer. A paint sprayer is essential for even coverage on the irregular surfaces. Rolling black paint onto overhead joists is a miserable task that produces drips and uneven coverage.
Phase 4: Lighting — More Than One Bare Bulb
Garage lighting is the most under-invested element of most garage remodels. A single overhead fixture casts shadows everywhere and leaves the corners dark. The lighting plan for a remodeled garage uses multiple fixtures to eliminate shadows and provide task lighting at work surfaces.
LED shop lights are the standard garage lighting fixture. They are 4-foot-long strips that link together and mount to the ceiling or hang from chains. Four to six fixtures, arranged in two parallel rows, provide uniform illumination for a two-car garage. The fixtures cost $20 to $40 each. The total cost is $80 to $240. LED shop lights use a fraction of the electricity of fluorescent fixtures, produce more light per watt, and work in cold temperatures where fluorescents flicker and fail.
Task lighting is a separate fixture above the workbench. A dedicated LED fixture or two mounted under the upper cabinets, or a single fixture above the bench, illuminates the work surface without casting shadows from the person standing in front of it. The task light costs $20 to $50.
Phase 5: Electrical Upgrade
A standard garage has one or two outlets and a single overhead light on one circuit. A remodeled garage needs more. Outlets every 6 to 8 feet along the workbench wall. A dedicated 20-amp circuit for power tools. A 240-volt outlet if the garage will house a table saw, welder, or electric vehicle charger. The electrical upgrade requires an electrician and a permit. The cost is $1,000 to $3,000 depending on the number of circuits and whether the existing panel has capacity. This is the one phase of the remodel that is not DIY. Electrical work in a garage requires a licensed electrician.
Phase 6: Storage Systems
Garage storage falls into three zones. Overhead storage uses the ceiling space above the garage door tracks for bins of seasonal items. Overhead racks bolt to the ceiling joists and hold 400 to 600 pounds. A 4-foot by 8-foot overhead rack costs $100 to $200. Wall storage uses slatwall, pegboard, or shelving for items that are accessed regularly. Floor storage is for large items that cannot be hung, such as a tool chest, a compressor, or a lawnmower. The storage plan should keep the floor as clear as possible so the cars still fit. Wall and overhead storage preserve floor space. Floor storage consumes it.
Closed cabinets are worth the cost in a garage. Open shelves collect dust. Everything on them develops a fine layer of garage grime within months. Cabinets with doors protect the contents from dust and make the garage look organized even when the inside of the cabinets is chaotic. Metal garage cabinets cost $100 to $300 each. Used kitchen cabinets from a remodel are a free or low-cost alternative. They are not as durable as metal garage cabinets, but they are clean, enclosed, and mount to the wall the same way.
Remodel Sequence and Timeline
| Phase | DIY Time | Pro Time |
| Floor (epoxy or tiles) | 2-3 days | 1-2 days |
| Walls (drywall + paint) | 2-3 weekends | 3-5 days |
| Ceiling (drywall or paint joists) | 1-2 weekends | 2-3 days |
| Lighting (fixture installation) | 1 day | 1 day |
| Electrical upgrade | Not DIY | 1-2 days |
| Storage (racks, cabinets, slatwall) | 1 weekend | 1-2 days |
| Total calendar time | 4-8 weekends (2-3 months) | 2-3 weeks |
Common Garage Remodel Mistakes
- Painting the floor instead of coating it. Latex garage floor paint peels under hot tires within two years. Epoxy or interlocking tiles are the only durable floor solutions.
- Flat paint on walls. Garage walls get dirty. Flat paint cannot be cleaned. Use satin or semi-gloss.
- Insufficient lighting. Two rows of LED shop lights are the minimum for a two-car garage. One fixture in the center leaves the walls and corners dark.
- Open storage only. Everything on open shelves gets dusty. A mix of closed cabinets and open shelving keeps the garage looking organized and the contents clean.
- Remodeling before fixing water issues. If water enters the garage through the door seal, the foundation, or the walls, fix it before any remodeling begins. Epoxy does not stick to wet concrete. Drywall absorbs water and molds. The water problem must be solved first.
Frequently Asked Questions
What order should I do the phases in a garage remodel?
Start at the top and work down. Ceiling first. Then walls. Then electrical and lighting, because the wiring runs through the studs before drywall goes up. Then floor last, because everything above the floor produces dust, drips, and debris that would ruin a new floor finish. The sequence is: ceiling, electrical rough-in, insulation, walls, paint, floor, storage. Following the sequence prevents rework. A floor that is coated before the ceiling is painted will be covered in paint drips.
How much does a full garage remodel cost?
A DIY garage remodel with epoxy floor, drywalled walls and ceiling, LED lighting, and a basic storage system costs $2,500 to $5,000 in materials for a two-car garage. A professional remodel of the same scope costs $8,000 to $18,000. The DIY savings are $5,500 to $13,000. The work takes 2 to 3 months of weekends. The garage remains usable during most of the remodel because the phases are sequential and each phase affects only one surface at a time.
The Garage That Finally Works
A remodeled garage is still a garage. The cars still park inside. The floor is coated epoxy instead of stained concrete. The walls are painted drywall instead of exposed studs. The ceiling is finished or neatly painted. The lights are bright and shadow-free. The tools are organized on slatwall and in cabinets instead of piled on a workbench. The garage performs the same functions it always did. Parking, storage, projects. It just performs them in a space that looks finished, cleans easily, and makes the work done inside it more efficient. The remodel cost is $2,500 to $18,000 depending on scope and who does the work. The result is a garage that feels like part of the house instead of the room the house was built on top of.
Last modified: June 22, 2026