Installing laminate flooring on a concrete slab is fundamentally the same process as installing it on a wood subfloor, with one critical difference: moisture. Concrete wicks water from the ground. A laminate plank sitting on a damp concrete slab absorbs that moisture through the bottom and swells. The joints cup, the surface bubbles, and the floor is ruined within months. No laminate manufacturer warrants a floor installed over concrete without a vapor barrier.
The second difference is flatness. Concrete slabs are rarely flat. The floor must be leveled before the laminate goes down. A floor that is not flat feels hollow underfoot and fails at the click-lock joints. Here is how to test for moisture, level the slab, install the vapor barrier, and lay the floor so it stays flat and dry for the life of the warranty.
Step One: Test the Concrete for Moisture
Perform a moisture test before buying the flooring. Do not skip this step on a below-grade slab, which is a basement or a garden-level room where the concrete is below ground level. Below-grade slabs have higher moisture levels and are more likely to fail a moisture test.
The calcium chloride test is the most reliable DIY method. A test kit costs $20 to $30 and includes a small dish of calcium chloride crystals that you place on the concrete and seal under a plastic dome for 60 to 72 hours. The crystals absorb moisture from the concrete. Weigh the dish before and after. The weight gain tells you the moisture vapor emission rate in pounds per 1,000 square feet per 24 hours. Most laminate manufacturers require a rate of 3 pounds or less. Some require 5 pounds or less. The maximum allowable rate is printed in the flooring installation instructions. If your slab exceeds the limit, you cannot install laminate directly. You must apply a concrete sealer to reduce the moisture transmission, or choose a different flooring material such as luxury vinyl plank, which is waterproof.
The plastic sheet test is a rough check but not a substitute for the calcium chloride test. Tape a 2-foot by 2-foot piece of clear plastic sheeting to the concrete with duct tape on all four edges. Wait 24 hours. If moisture beads form on the underside of the plastic, or if the concrete under the plastic is darker than the surrounding concrete, the slab has high moisture. The plastic test tells you there is moisture. It does not tell you how much. If the plastic test is positive, follow up with a calcium chloride test before proceeding.
Step Two: Level the Concrete
Laminate requires the subfloor to be flat within 3/16 inch over a 10-foot span. Check this with a 10-foot straightedge or a long level laid across the floor in multiple directions. Mark low spots with a pencil. Mark high spots with an X.
Grind down high spots with a concrete grinder, which you can rent for $50 to $80 per day. A grinder is a walk-behind machine with a rotating abrasive disc that shaves down the concrete surface. It is heavy, loud, and produces dust that gets everywhere. Wear a respirator, seal the room with plastic sheeting, and ventilate if possible. An angle grinder with a diamond cup wheel handles small high spots and edges. Do not grind concrete without a dust shroud and a shop vacuum attached to the grinder. Concrete dust is silica. It damages lungs.
Fill low spots with a cement-based self-leveling compound. The compound mixes with water to a pancake-batter consistency, is poured onto the floor, and flows to fill the low areas. Prime the concrete with the primer specified by the leveling compound manufacturer before pouring. The primer prevents the concrete from sucking the water out of the compound too fast, which causes it to set before it can flow level. Pour the compound and spread it with a gauge rake or a trowel. It finds its own level within 20 to 30 minutes. You can walk on it in 2 to 4 hours. Laminate can be installed over it 24 hours later.
A self-leveling pour over an entire room is a two-person job. One person mixes the compound in buckets with a drill and a mixing paddle. The other person pours and spreads. The compound begins to set within 20 minutes of mixing. Mix only as much as you can pour and spread in 15 minutes. Do not try to pour an entire room from a single batch. The compound will set in the bucket before you can pour it.
Step Three: Install the Vapor Barrier and Underlayment
Roll out 6-mil polyethylene sheeting across the entire floor. This is the vapor barrier. It prevents moisture from the concrete from reaching the laminate. Overlap the seams by at least 6 inches. Tape the seams with waterproof tape, not duct tape or masking tape. The tape must create a continuous barrier across the entire floor. Run the polyethylene up the walls 2 to 3 inches and trim it after the floor is installed. The lip prevents moisture from wicking up the edge of the laminate at the perimeter.
If your laminate planks have an attached underlayment that includes a vapor barrier, check the manufacturer’s instructions. Some attached underlayments are rated for use over concrete without a separate polyethylene sheet. Others require an additional vapor barrier. The difference is in the perm rating of the attached underlayment. A perm rating of less than 1.0 is a vapor barrier. A perm rating higher than 1.0 is a vapor retarder but requires an additional sheet over concrete. The manufacturer’s instructions state which is required.
Roll out the foam underlayment over the vapor barrier. The foam is the same underlayment used over wood subfloors. It provides cushioning, sound absorption, and minor leveling. Butt the seams together. Do not overlap foam underlayment, which creates a bump that telegraphs through the laminate. Tape the seams with the tape included with the underlayment. Trim the underlayment flush with the vapor barrier.
Step Four: Acclimate the Flooring
Laminate planks must acclimate in the room where they will be installed for at least 48 hours. The boxes should be laid flat in stacks of no more than three, with air space between the stacks. The room temperature must be between 65 and 85 degrees. The relative humidity must be between 35 and 65 percent. These are the same requirements as for a wood subfloor installation. Concrete does not change the acclimation requirements. The planks are acclimating to the room air, not to the subfloor.
Step Five: Install the Laminate
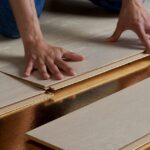
The installation over concrete is the same as over a wood subfloor. Start in a corner. Maintain a 1/4-inch expansion gap around the entire perimeter using spacers. Click the planks together at the short ends, then fold the row down to engage the long edges. Stagger the end joints by at least 12 inches. Cut the last row to width with a circular saw, jigsaw, or laminate cutter.
Use a tapping block and a pull bar as you would on any subfloor. Do not glue the planks to the concrete. Laminate is a floating floor. It must expand and contract independently of the slab. Gluing the perimeter or the seams to the concrete locks the floor in place and causes buckling when the planks expand.
Install transition strips at doorways where the laminate meets other flooring. The transition track is attached to the concrete with construction adhesive or with masonry screws in predrilled holes. Do not attach the transition to the laminate. The laminate floats underneath the transition.
Special Considerations for Basements
Basement slabs have higher moisture levels than above-grade slabs. The vapor barrier is essential. A dimpled polyethylene membrane, such as DMX or Delta-FL, provides both a vapor barrier and an air gap between the concrete and the laminate. The air gap allows any moisture that does penetrate to evaporate rather than condense against the laminate. Dimpled membranes cost $0.30 to $0.50 per square foot and are recommended for basement installations where moisture is a concern, even if the slab passes a moisture test.
Basement slabs are colder than above-grade floors. Laminate over a concrete basement floor will feel cold underfoot in winter. An underlayment with a higher R-value, typically 1.0 to 3.0, provides some thermal insulation. It will not make the floor warm, but it will make it less cold. An insulated underlayment adds $0.20 to $0.40 per square foot compared to standard foam underlayment.
Basements are prone to flooding. Laminate installed in a basement that floods even once is ruined. If your basement has ever had water on the floor, from a plumbing leak, a water heater failure, a sewer backup, or groundwater infiltration, choose luxury vinyl plank instead of laminate. Vinyl plank is waterproof. Laminate is not.
Frequently Asked Questions
Should I glue laminate flooring to concrete?
No. Laminate is designed as a floating floor. Gluing it to concrete prevents the planks from expanding and contracting, which causes buckling. Some laminate products are rated for glue-down installation, but this is primarily a commercial application. Residential laminate should be floated over the appropriate underlayment and vapor barrier.
Can I install laminate over radiant heated concrete?
Yes, if the laminate is rated for radiant heat. The packaging says suitable for radiant heat or lists a maximum surface temperature. Radiant-heated concrete must be operated at a reduced temperature for several days before installation to drive out residual moisture in the slab. The heating system must be turned off or set to its lowest setting during installation. After installation, the temperature must be increased gradually over several days. Rapid temperature changes cause the laminate to expand or contract too quickly and damage the joints. The specific temperature protocol is in the flooring installation instructions.
My concrete floor is painted. Can I install laminate over it?
Yes, if the paint is well-adhered and not peeling. Scrape any loose paint. The vapor barrier and underlayment go over the paint. The paint itself is not a vapor barrier unless it is a specifically formulated epoxy moisture barrier. Standard floor paint does not block moisture. Do not rely on paint as a substitute for a polyethylene vapor barrier.
Last modified: June 15, 2026