A standard ceiling light fixture box is not strong enough to hold a ceiling fan. The box must be fan-rated, which means it is made of heavy-gauge metal, is attached to the framing with screws or lag bolts rather than nails, and is labeled with its weight rating. A fan that weighs 20 pounds exerts more than 20 pounds of force on the box because the fan vibrates and the blades generate torque. A standard light fixture box is rated for 10 to 15 pounds of static weight. It will eventually pull out of the ceiling if a fan is mounted to it.
Replacing a ceiling box with a fan-rated box takes 30 to 60 minutes with attic access and 60 to 90 minutes without attic access using an expanding brace. Here is how to identify whether your existing box is fan-rated and how to replace it if it is not.
First: Is the Existing Box Fan-Rated
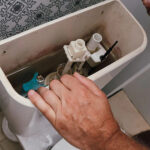
Turn off the power at the breaker. Remove the existing light fixture. Look inside the box. A fan-rated box has a label that says acceptable for fan support or lists a weight rating in pounds. The label is a sticker inside the box or embossed into the metal. If there is no label, the box is not fan-rated. No label means no rating. Do not assume an older metal box is strong enough. If it is not labeled, it is not rated.
A fan-rated box is attached to the framing with screws or lag bolts. A standard light fixture box is nailed to the side of a joist. Look at how the box is attached. If it is held by nails driven through the side of the box into a joist, it is not fan-rated. If it is held by screws or bolts through the back or the sides of the box into solid framing, it may be fan-rated. The label is the definitive answer. The attachment method is a clue. The label is the authority.
Three Ways to Install a Fan-Rated Box
| Method | Access Required | Time | Best For |
| Attic retrofit | Attic above the ceiling | 30–45 min | Homes with an accessible attic |
| Expanding brace | None (through the ceiling hole) | 60–90 min | Between floors, no attic access |
| Saddle or pancake box | None (through the ceiling hole) | 45–60 min | Joist directly next to the existing hole |
Method One: Attic Retrofit
If there is an attic above the ceiling, this is the easiest method. Go into the attic and locate the existing box from above. It will be nailed to a joist or mounted on a cross-brace. Remove the nails or screws holding the box to the framing. Disconnect the wiring from inside the box before removing it. Remove the box. Leave the wiring in the attic.
Install a fan-rated box that spans between two joists. A fan-rated box with an adjustable steel bar extends to fit between joists spaced 16 to 24 inches apart. The bar has mounting brackets on each end that screw into the joists. The box attaches to the bar with U-bolts or machine screws. Position the box so it is centered in the ceiling hole and flush with the bottom of the ceiling drywall. The box must be flush or recessed no more than 1/4 inch above the drywall surface. A box recessed too deeply creates a gap between the box and the fan canopy that is a fire hazard because it exposes the wiring connections to the ceiling cavity.
Feed the existing wiring into the new box through one of the knockouts. Reconnect the wiring inside the box as it was originally configured. Install the box cover or mount the fan directly if you are installing the fan immediately. The attic method produces the strongest installation because the box is mechanically fastened to the framing with screws, not friction-fit.
Method Two: Expanding Brace Through the Ceiling Hole
If there is no attic access, which is the case when the ceiling is between floors or under a low-pitch roof, use an expanding brace kit. The kit contains a metal bar that expands between two joists and a fan-rated box that attaches to the bar. The entire installation is done through the existing 4-inch hole in the ceiling. No access above the ceiling is required. No drywall is cut.
Remove the old box. If the box is nailed to a joist, pry it off with a flat bar. If the box is mounted on a cross-brace, cut the brace with a reciprocating saw or a hacksaw blade. Remove the old box through the ceiling hole.
Insert the expanding brace into the ceiling hole. Position the brace so it spans between two joists. Turn the bar by hand or with a wrench to expand it. The ends of the brace have teeth that bite into the joists as the brace expands. Tighten the brace until it is firmly wedged between the joists. The brace should not move when you pull on it. The friction of the teeth against the wood holds the brace in place and supports the weight of the fan. This is counterintuitive. A device held in place by friction alone is supporting a vibrating fan. The expanding brace is engineered for this application and is rated for fans up to 70 pounds when properly installed.
Attach the fan-rated box to the brace. The box has a saddle that slides onto the brace from below. Position the box in the center of the ceiling hole. Tighten the U-bolt or screws that clamp the box to the brace. The box must be flush with the ceiling drywall. Feed the wiring into the box. The expanding brace method is code-compliant and is used by electricians for retrofit installations where attic access is not available.
Method Three: Saddle or Pancake Box
If the existing ceiling hole is immediately next to a joist, you can install a saddle box or a pancake box. A saddle box is a shallow metal box that straddles the joist. One side of the box rests on top of the drywall and is screwed into the joist through the side of the box. A pancake box is a very shallow round box, approximately 1/2 inch deep, that is screwed directly into the bottom of the joist through the back of the box.
The existing hole must be enlarged slightly on the joist side to expose enough of the joist to attach the box. Use a drywall saw or a jab saw to cut away the drywall along the joist edge. The cut area is covered by the fan canopy, so it does not need to be patched. The canopy of a standard ceiling fan is 5 to 6 inches in diameter. The ceiling hole must be smaller than the canopy. Do not cut a hole larger than the canopy will cover.
Screw the saddle box into the side of the joist with the screws provided. The box must be rated for ceiling fan support. A standard saddle box is not fan-rated. Buy the box specifically labeled for fan support. A pancake box is limited in wiring capacity because it is so shallow. Confirm that the existing wiring will fit in the box before committing to a pancake box. A large wire nut takes up more space than you expect in a 1/2-inch deep box.
Frequently Asked Questions
My ceiling already has a fan. Can I reuse the existing box for a new fan?
Yes, if the box is fan-rated and the weight rating is equal to or greater than the new fan. Check the label. If the box was supporting a ceiling fan, it is almost certainly fan-rated, but confirm before hanging a heavier fan on it. The weight rating is on the label. If the label is missing but the box is heavy-gauge metal, attached with lag bolts rather than nails, and was supporting a fan, you can proceed. If you are uncertain, replace the box. The cost of a new box and an hour of labor is less than the cost of a ceiling fan falling.
Are plastic ceiling boxes ever fan-rated?
Yes, but they are rare. Most plastic boxes are not fan-rated. A plastic fan-rated box is molded from a heavier, fiber-reinforced plastic and is labeled for fan support. The label is molded into the plastic, not a sticker that can fall off. If the plastic box does not say fan-rated in raised letters in the plastic itself, it is a standard light fixture box and cannot support a fan. Standard thermoplastic boxes are rated for 10 to 15 pounds. A ceiling fan requires a box rated for 35 to 70 pounds.
My ceiling has separate wires for a fan and a light, controlled by two switches. Does the box replacement change the wiring?
No. The box replacement does not change the wiring configuration. The existing wires are disconnected from the old box, the old box is removed, the new box is installed, and the wires are reconnected exactly as they were. Take a photo of the wiring connections before disconnecting anything. Replicate the connections in the new box. The two switch wires, typically black and red, are the hot wires for the fan and the light. The white wire is the shared neutral. The bare or green wire is ground. The wiring is unchanged by the box replacement.
Last modified: June 17, 2026