How to Fix a Leaky Delta Tub Faucet: A Practical Homeowner Guide
![]() • June 14, 2026
• June 14, 2026
Water dripping from the tub spout is not just annoying. At one drip per second, you are wasting roughly 2,000 gallons of water per year. The fix is usually a worn cartridge, a bad O-ring, or a failed spring and seat assembly inside the valve body. On a Delta tub faucet, the repair takes 30 to 60 minutes, costs $15 to $40 in parts, and requires no soldering, no cutting into the wall, and no calling a plumber.
Delta faucets use a cartridge system. Most tub and shower models made since the 1990s use the Delta Monitor series with a pressure-balanced cartridge that prevents temperature spikes when someone flushes a toilet. The repair is the same for most models. Here is how to do it.
Which Delta Faucet Do You Have
If your Delta tub faucet has a single handle that rotates to control temperature and tilts to control water volume, it uses a Delta Monitor cartridge. This is the most common type. The repair cartridge is Delta part number RP19804 for most models or RP46074 for newer models with the MultiChoice universal valve. If your faucet has separate hot and cold handles, each handle contains a smaller stem assembly with washers and seats. The repair is different and covered at the end of this guide.
Look under the handle for a set screw. On most Delta single-handle models, there is a small plastic cap on the front of the handle or a set screw on the underside of the handle near the base. Remove the cap or loosen the set screw with a hex key, typically 1/8 inch, to access the cartridge.
What You Need
| Item | Estimated Cost | Purpose |
| Delta cartridge (RP19804 or RP46074) | $30–$50 | Replacement cartridge |
| Delta spring and seat kit (RP4993) | $5–$10 | Replacement springs and rubber seats |
| Plumber’s silicone grease | $5–$8 | Lubricates O-rings without damaging rubber |
| Needle-nose pliers | $10–$20 | Removing old springs and seats |
| Allen wrench set or hex keys | $5–$15 | Removing the handle set screw |
| Phillips and flathead screwdrivers | $10–$20 | Removing trim plate and cartridge retainer |
| Adjustable wrench or channel locks | $15–$25 | Removing stubborn cartridges |
Step One: Turn Off the Water
Locate the water shutoff valve for the tub. Many bathrooms have an access panel behind the tub faucet in an adjacent closet or on the other side of the wall. Look for a small door or panel. If your tub does not have individual shutoffs, turn off the main water supply to the house. The main shutoff is typically in the basement, crawl space, or garage where the water line enters the house. It may also be in a ground-level box near the street.
After shutting off the water, open the tub faucet to release any pressure and drain the water in the pipes. Leave it open during the repair. If you turned off the main water supply, do not use any other faucets, toilets, or appliances while the water is off. Air can enter the pipes, and the water heater should not be operated without water pressure.
Cover the tub drain with a rag or a drain cover. The next steps involve small screws, springs, and plastic pieces that will fall directly into the drain if you do not block it. Retrieving a spring from a P-trap is not part of this guide.
Step Two: Remove the Handle and Trim Plate
Locate the set screw on the handle. On most Delta single-handle faucets, it is on the underside of the handle near the base, recessed in a small hole. Use an Allen wrench, typically 1/8 inch, to loosen the set screw. Do not remove it completely. Loosen it enough to slide the handle off the cartridge stem. If the handle is stuck, a gentle wiggle while pulling breaks the mineral deposit seal. Do not pry against the wall with a screwdriver.
Remove the trim plate, also called the escutcheon. It is held in place by two screws through the plate into the valve body or by friction clips. Remove the screws or pull the plate straight off. If the plate is caulked to the wall, run a utility knife around the edge to cut the caulk before pulling. The plate covers a hole in the wall that gives you access to the valve body inside.
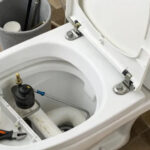
Behind the trim plate, you will see the valve body with the cartridge installed in the center. There may be a metal or plastic retainer clip holding the cartridge in place. Note the position of the cartridge. The hot side is typically on the left. Mark it with a piece of tape if you are unsure. The new cartridge must be installed in the same orientation.
Step Three: Remove the Old Cartridge
Remove the retainer clip if present. It is a U-shaped brass or plastic clip that slides out from the top of the valve body. Use needle-nose pliers to grip it and pull straight up. The clip is small and will fly across the room if you lose your grip. Hold a finger over it as you pull.
Grip the cartridge stem with pliers and pull it straight out. The cartridge may be tight from mineral deposits. Pull steadily. Do not twist or rock it side to side, which can damage the valve body. If the cartridge is stuck, Delta sells a cartridge removal tool or you can use a pair of channel locks with a firm straight pull. Soaking the area with white vinegar for 30 minutes dissolves mineral buildup that is locking the cartridge in place.
When the cartridge comes out, water may drain from the valve body. This is the water that was trapped in the pipes above the shutoff. A few cups of water is normal. A continuous stream means the water is not fully shut off. Stop and verify the shutoff valves.
Step Four: Replace the Springs and Seats
Inside the valve body, behind where the cartridge sat, there are two small rubber seats with stainless steel springs underneath them. These are the components that fail most often. The spring pushes the rubber seat against the back of the cartridge to create a watertight seal. When the spring weakens or the rubber hardens, water leaks past the seal and drips from the spout.
Remove the old springs and seats with needle-nose pliers. They sit in small recesses in the back of the valve body, one on the hot side and one on the cold side. Note which direction the springs are oriented. The narrow end of the spring goes into the rubber seat. The wide end faces the back of the valve body.
Install the new springs and seats from the Delta RP4993 kit. Place the new seat on the narrow end of the new spring. Insert the assembly into the recess, wide end of the spring first, and press it into place. The rubber seat faces outward toward where the cartridge will sit. Both sides should feel the same when pressed. If one side feels noticeably different, the spring is not seated correctly.
Step Five: Install the New Cartridge
Coat the O-rings on the new cartridge with a thin layer of plumber’s silicone grease. This lubricates the O-rings so the cartridge slides in smoothly, prevents the rubber from drying out over time, and helps create a watertight seal. Do not use petroleum jelly, which degrades rubber O-rings.
Slide the new cartridge into the valve body in the same orientation as the old one. The cartridge should slide in with firm but smooth pressure. If it stops before fully seating, do not force it. Remove it and check that the springs and seats are properly positioned. The cartridge must press evenly against both spring and seat assemblies to seal correctly.
Reinstall the retainer clip by sliding it down into the slot on top of the valve body. It should click or snap into place, locking the cartridge in position.
Step Six: Reassemble and Test
Turn the water back on slowly. Opening the shutoff valve gradually prevents a pressure surge that can damage the new cartridge. Check for leaks around the cartridge and valve body before reinstalling the trim plate. If water is leaking from the valve body, the cartridge is not fully seated or the retainer clip is not locked in place. Do not reinstall the trim plate until the valve body is dry.
Test the faucet. Turn the handle through the full range of hot and cold. Check that the temperature control works and that water stops completely when the handle is in the off position. Check that the tub spout and showerhead both work if your faucet has a diverter. Run the water for two to three minutes to flush any debris that may have entered the pipes during the repair.
Reinstall the trim plate and handle. Tighten the set screw just enough to hold the handle firmly. Overtightening strips the threads or cracks the plastic handle.
If the Leak Is From the Tub Spout, Not the Handle
If water drips from the tub spout while the shower is running, the diverter is the problem. On a Delta tub faucet with a pull-up diverter on the spout, the diverter gate inside the spout has worn out. The fix is to replace the entire tub spout rather than the cartridge. Delta tub spouts thread onto a pipe nipple extending from the wall. Unscrew the old spout by turning it counterclockwise. Wrap the pipe threads with Teflon tape, three to four wraps clockwise. Screw the new spout on until it is hand-tight against the wall, then give it an additional quarter turn with a strap wrench. Do not overtighten, which can crack the plastic spout body or break the pipe behind the wall.
If You Have a Two-Handle Delta Faucet
Two-handle Delta tub faucets use separate hot and cold stems with washers and seats. Turn off the water. Remove the handle by unscrewing the cap and handle screw. Remove the trim sleeve to expose the stem. Unscrew the stem from the valve body with an adjustable wrench. The stem has a rubber washer on the bottom held by a screw. Replace the washer. Inspect the brass seat inside the valve body for pitting or roughness. If the seat is damaged, use a seat wrench to remove and replace it. Reassemble in reverse order. This is a simpler repair than the cartridge replacement and uses a $2 washer instead of a $40 cartridge.
Frequently Asked Questions
Will Delta send me a free replacement cartridge?
Yes. Delta faucets carry a lifetime warranty on the cartridge and all internal components. Contact Delta customer service with your faucet model number, which is usually stamped on the trim plate or on the original installation manual. Delta will ship you a replacement cartridge at no charge. The wait is typically one to two weeks. If you need the repair done today, buying the cartridge at a home center for $30 to $50 and keeping the free replacement as a spare is a reasonable approach.
I replaced the cartridge and it still leaks. What did I miss?
The springs and seats behind the cartridge. A common mistake is replacing the cartridge without replacing the springs and seats, which are the components that actually fail in most cases. The cartridge itself may be fine. The springs lose tension and the rubber seats harden over time. If you replaced the cartridge and skipped the spring and seat kit, reopen the valve and install the RP4993 kit. It costs $5 to $10 and fixes the majority of Delta tub faucet leaks. The second most common mistake is installing the springs backward. The narrow end goes into the rubber seat. The wide end faces the valve body.
The cartridge is completely stuck. How do I get it out?
Soak the valve body with white vinegar for 30 minutes. Vinegar dissolves the mineral deposits that lock the cartridge in place. After soaking, grip the cartridge stem firmly with channel locks and pull straight out. If it still does not budge, Delta sells a cartridge removal tool that threads onto the cartridge stem and uses a mechanical advantage to pull it free. Home Depot and Lowe’s carry these tools for $15 to $25. As a last resort, you can drill out the center of the cartridge with a hole saw bit slightly smaller than the cartridge diameter, then collapse the remaining plastic shell inward and remove the pieces. This destroys the old cartridge but works when nothing else will.
Last modified: June 14, 2026