A two-handle bathtub faucet leaks because a rubber washer, a cartridge, or a brass seat has worn out. The water drips from the spout. The leak is almost always on the hot water side because hot water degrades rubber washers faster than cold water. The fix costs $2 to $15 in parts per handle and takes 30 minutes for the first handle and 15 minutes for the second once you know the process.
The faucet is either a compression faucet with a rubber washer at the end of a threaded stem, or a cartridge faucet with a plastic cartridge that pulls straight out. Compression faucets are found in homes built before the 1990s. Cartridge faucets are found in newer homes. The repair is different for each. Here is how to identify what you have and fix the leak.
First: Determine Which Handle Is Leaking
Water dripping from the tub spout can come from the hot side, the cold side, or both. To determine which, turn off the water supply to the tub. If your tub does not have individual shutoffs, turn off the main water supply. Remove both handles and both stems or cartridges. Turn the water back on briefly. Water will spray from the open valve bodies. Cover them with a rag. If water comes from the hot side opening but not the cold side, the hot side washer or cartridge is the problem. If water comes from both sides, both need repair. The leak is from whichever side allows water to pass when the handle is closed.
An easier method that does not require removing both stems: turn the hot handle slightly past the closed position. If the drip slows or stops, the hot washer is failing and is being pressed tighter against the seat by turning past closed. If turning past closed does not change the drip, the cold side is the likely source. This test is not definitive but often identifies the problem side.
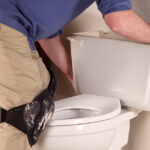
Compression Faucet Repair: Replace the Washer and Seat
A compression faucet has a threaded brass stem that screws into the valve body. Turning the handle screws the stem down until a rubber washer on the bottom of the stem presses against a brass seat and stops the water flow. When the washer wears out, water leaks past it. When the brass seat becomes rough or pitted, the new washer cannot seal against it and the leak continues even after replacing the washer.
Shut off the water. Remove the handle. Pry the decorative cap off the center of the handle with a flathead screwdriver. Remove the Phillips screw underneath. Pull the handle straight off. If the handle is stuck from mineral deposits, use a handle puller, which costs $10 to $15 and grips the back of the handle while a threaded screw presses against the stem to push the handle off without damaging the trim.
Remove the trim sleeve, which is the chrome tube covering the stem. It unscrews by hand or with a strap wrench. The stem is now exposed. Unscrew the stem from the valve body with an adjustable wrench or a deep socket. Turn counterclockwise. The stem threads out of the valve body. The stem is brass and may require significant force to break free. Hold the wrench close to the valve body to avoid bending the stem.
On the bottom of the stem is a black rubber washer held by a brass screw. Remove the screw and the washer. The washer is the part that has failed. Take the stem and the washer to the hardware store to match the replacement. Stem washers are not universal. The diameter and thickness vary by brand and age. The correct washer is a flat washer, not a beveled washer. Most bathtub faucets use a flat washer. Beveled washers are for sink faucets. Bring the old washer. Match it exactly.
Inspect the brass seat inside the valve body. The seat is a brass ring with a hexagonal or square hole in the center. Shine a flashlight into the valve body. The seat surface where the washer presses should be smooth and shiny. If it is rough, pitted, or grooved, the new washer will not seal against it. Remove the seat with a seat wrench. A seat wrench is a tapered metal bar with fluted edges that grip the inside of the seat. Insert the wrench, tap it with a hammer to seat it, and turn counterclockwise. The seat unscrews from the valve body. Take the old seat to the hardware store to match the replacement. Seats vary by thread size and by whether they are flat or tapered. Bring the old one.
Install the new seat by screwing it into the valve body. Tighten it firmly with the seat wrench. Do not overtighten, which can crack the valve body. Install the new washer on the stem with the brass screw. Tighten the screw firmly. A loose washer screw allows the washer to wobble and leak. Apply a thin coat of plumber’s silicone grease to the washer and the stem threads. The grease lubricates the stem and extends the life of the washer. Reinstall the stem by screwing it into the valve body clockwise. Tighten it with a wrench until it is snug. Do not overtighten the stem into the closed position, which crushes the new washer and shortens its life.
Cartridge Faucet Repair: Replace the Cartridge
A cartridge faucet has a plastic cartridge that pulls straight out of the valve body instead of screwing out. The cartridge contains internal seals that wear out. Some cartridges have a replaceable seal on the end. Most require replacing the entire cartridge.
Shut off the water. Remove the handle and trim sleeve as for a compression faucet. The cartridge is held in place by a retainer clip or a threaded retaining nut. Remove the clip with needle-nose pliers or unscrew the retaining nut. Grip the cartridge stem with pliers and pull it straight out. Do not twist or rock the cartridge, which can break it and leave plastic pieces inside the valve body. If the cartridge is stuck, a cartridge removal tool specific to the faucet brand threads onto the stem and pulls the cartridge free.
Take the old cartridge to the hardware store to match the replacement. Identify the brand if possible. Delta, Moen, American Standard, and Pfister use different cartridges. The brand name is often stamped on the trim plate, the handle, or the spout. If the brand is unknown, the cartridge itself may have a part number molded into the plastic. Big-box hardware stores carry common replacement cartridges. A plumbing supply store has a wider selection.
Install the new cartridge in the same orientation as the old one. Coat the O-rings with silicone grease. Slide the cartridge into the valve body. Reinstall the retainer clip or retaining nut. Turn the water back on and test. A cartridge that leaks after replacement is not fully seated, is installed backward, or is the wrong cartridge for the valve.
Should You Repair Both Sides If Only One Is Leaking
Yes. The washers and cartridges on both sides are the same age. If the hot side has failed, the cold side will fail soon. The time to repair both sides is now, while you have the tools out and the water is already shut off. The second side takes 10 to 15 minutes. Replacing both washers or cartridges at the same time costs an extra $2 to $15 and prevents a second repair visit within months.
Frequently Asked Questions
Water is leaking from around the stem, not from the spout. What do I fix?
The stem packing or the O-ring on the stem is the problem. On a compression faucet, there is a packing nut around the stem just below the handle. Tighten the packing nut slightly clockwise. If tightening the nut stops the leak, the packing was loose. If the leak continues, the packing material inside the nut is worn out. Unscrew the packing nut, remove the old packing, and replace it with new graphite packing string, which costs $3 to $5 and wraps around the stem under the nut. On a cartridge faucet, the O-rings on the cartridge body are worn. Replace the cartridge. The new cartridge includes new O-rings.
I replaced the washer and it still drips. What did I miss?
The seat is rough or pitted. A new washer cannot seal against a damaged seat. Remove the stem and inspect the seat with a flashlight. If the seat is not perfectly smooth, replace it with a seat wrench. The washer screw is loose. A washer that wobbles leaks. Tighten the screw. The washer size is wrong. If the washer is slightly too small, it does not cover the seat completely. If it is slightly too large, it binds in the valve body and does not seat evenly. Match the old washer exactly.
Which direction do I turn the handle to shut off the water? My handles turn the opposite of what I expect.
Most compression faucet handles turn clockwise to close and counterclockwise to open. Some older faucets, particularly American Standard models from the mid-century, turn counterclockwise to close. The direction is determined by the stem threading. If your handles turn the wrong direction compared to a modern faucet, the stems were installed on the wrong sides at some point. The hot stem should be on the left and the cold on the right, but they are threaded in opposite directions so that both handles turn the same way to open and close. If the stems are swapped, the handles turn opposite directions. The function is the same. The wrong direction is not a defect. It is a stem that was installed on the wrong side during a previous repair.
Last modified: June 15, 2026