How to Finish an Attic for Storage: A Practical Attic Guide
![]() • June 20, 2026
• June 20, 2026
The attic has been storing things for years. The Christmas decorations are balanced across the joists. The luggage is wedged between two truss webs. A box of baby clothes is sitting directly on the drywall of the ceiling below, which is not designed to support weight and will eventually crack if it has not already. The attic is doing its job as storage, but it is doing it badly. Finishing an attic for storage means making it safe to walk on, easy to access, well-lit, and organized. It does not mean insulating the rafters, installing drywall, or adding HVAC. Storage attics are unconditioned, uninsulated at the roof, and ventilated. The goal is not to make the attic comfortable for people. It is to make it functional for boxes and to make walking through it possible without falling through the ceiling.
Attic Flooring: The Most Important Step
The attic floor is the ceiling of the room below. The joists are exposed, and the insulation is between them. Stepping between the joists onto the drywall below is how people fall through ceilings. The first step in any attic storage project is creating a safe walking and storage surface.
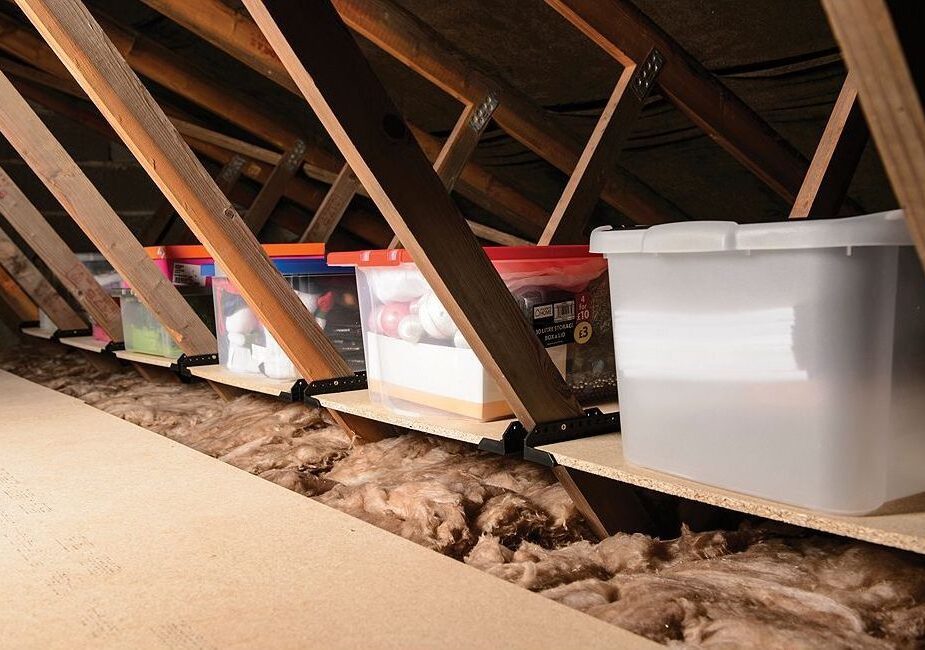
Attic decking is plywood or OSB laid across the joists. It distributes weight across multiple joists and provides a flat surface for walking and stacking boxes. The decking should be 1/2-inch or 3/4-inch thick. Thinner material will sag between joists under the weight of stored items. The panels are screwed to the joists, not nailed, so they can be removed if access to the insulation or wiring below is ever needed.
The decking does not need to cover the entire attic. A central walkway 24 to 36 inches wide running the length of the attic, with wider platforms at each end for storage, is sufficient for most attics. The walkway must be continuous from the access point. A path of disconnected plywood scraps that requires stepping from one joist to the next while carrying a box is not a walkway. It is a hazard.
Do not compress the attic floor insulation with the decking. Insulation works by trapping air. Compressed insulation loses R-value. If the insulation between the joists extends above the top of the joists, which it does in most attics with adequate R-value, the decking must be raised above the insulation. Attach 2×4 sleepers perpendicular to the joists, running across them, and screw the decking to the sleepers. The sleepers create an air gap that prevents the decking from compressing the insulation. The gap also allows airflow beneath the decking, which prevents moisture buildup.
Access: The Attic Ladder or Hatch
If the attic is accessed by a scuttle hole in a closet ceiling, which requires a stepladder to reach, every trip to the attic is an ordeal. A pull-down attic ladder is the single best investment in attic storage accessibility. It replaces the scuttle hole with a folding ladder that pulls down from the ceiling. The ladder installs in the existing opening or a slightly enlarged opening. The cost is $150 to $400 for the ladder and a half-day of installation. A pull-down ladder that you can descend while carrying an empty box is storage access. A scuttle hole that requires a stepladder and a boost is storage denial.
Per wikiHow’s guide, the attic access hatch or pull-down stairs must be weatherstripped and insulated to the same R-value as the attic floor. An uninsulated access hatch is a large thermal hole in the ceiling. Attach rigid foam insulation board to the back of the hatch panel. Weatherstrip the perimeter. The hatch should close tightly against the weatherstripping. An attic hatch that simply rests by gravity on the trim leaks conditioned air into the attic year-round.
Lighting: You Cannot Organize What You Cannot See
Most unfinished attics have zero built-in lighting, or a single bare bulb operated by a pull chain that is impossible to find in the dark. Attic lighting must be installed before the attic is organized because the organization cannot happen in the dark. A hardwired light fixture with a switch at the attic entrance is the best solution and requires an electrician. The cost is $200 to $500 for a basic fixture and switch.
The simpler alternative is battery-powered LED motion-sensor lights. They mount to the rafters with screws or adhesive, turn on automatically when motion is detected, and run on batteries for months. A string of four to six motion lights along the central walkway illuminates the entire attic for $40 to $80. The lights are not as bright as a hardwired fixture, but they are adequate for storage access and require no wiring. For an attic used once a month to retrieve holiday decorations, the battery lights are sufficient. For an attic accessed weekly, install a hardwired fixture.
Shelving and Organization
Boxes stacked directly on the attic decking are inaccessible except for the top box. To reach a box at the bottom of a stack, every box above it must be moved. Shelving solves this by giving each box its own accessible space. The simplest attic shelving is 2×4 and plywood racks built between the rafters. The rafters provide the vertical structure. Horizontal 2×4 cleats screwed to the rafters support plywood shelves. The shelves are 16 to 24 inches deep, matching the rafter spacing, and can be placed at any height.
Label every box on the end facing the walkway. The label should describe the contents and the season or category. “Christmas — ornaments” is useful. “Misc. kitchen” is not. The labeling takes an afternoon during the initial organization and saves hours of opening boxes to find things for the rest of the time the attic is used.
Place heavy items on lower shelves and over load-bearing walls where possible. The attic floor near the center of the joist span deflects more than near the ends. Heavy boxes of books stored in the center of the attic cause more joist deflection than the same boxes stored near the eaves where the joists are supported by the walls below. This is a minor consideration for most attics, but for attics with undersized joists or heavy storage loads, it prevents sagging.
Temperature and Moisture Management for Stored Items
A storage attic is unconditioned. The temperature swings from below freezing in winter to 130 degrees or more in summer. Not all items survive these conditions. Photographs, candles, electronics with batteries, vinyl records, and anything with adhesive will be destroyed by attic heat. Paper documents yellow and become brittle. Clothing and fabric develop a musty odor from humidity absorbed during summer and released during winter. Store only items that are heat-tolerant and moisture-tolerant in an unconditioned attic. Everything else belongs in climate-controlled storage.
Plastic bins with tight-fitting lids protect contents from dust, pests, and humidity better than cardboard boxes. Cardboard absorbs moisture from the air and becomes a food source for silverfish and other insects. Plastic bins cost $8 to $15 each and last indefinitely. Cardboard boxes are free from the grocery store and degrade within a few years in an unconditioned attic. The plastic bin is worth the cost for anything stored longer than one season.
Frequently Asked Questions
How much weight can an attic floor support for storage?
Ceiling joists in a typical residential attic are designed to support 10 to 20 pounds per square foot of dead load, which is the weight of the drywall ceiling below and the insulation above. Storage loads are additional. Distributed storage loads of 10 to 20 pounds per square foot, which is roughly the weight of boxes stacked two high across the decked area, are generally within the safety margin of standard ceiling joists. Heavy concentrated loads, such as a stack of books or a piece of furniture, should be placed over load-bearing walls where the joists are supported. If the attic will store heavy items regularly, have a structural engineer evaluate the joists before adding load.
Should I remove the existing floor insulation before decking the attic?
No. The insulation stays in place. It is the thermal barrier between the conditioned house below and the unconditioned attic above. Removing it would make the rooms below colder in winter and hotter in summer. The decking is installed above the insulation on sleepers, or the insulation is temporarily moved aside, the decking screwed down, and the insulation replaced around the decked area. Never remove attic floor insulation to make room for storage decking. The energy cost of missing insulation exceeds any convenience gained.
The Attic That Finally Works
A finished storage attic is not glamorous. It has no drywall, no paint, and no climate control. What it has is a floor you can walk on, a light that turns on when you enter, shelves that hold labeled bins, and a ladder that pulls down from the ceiling instead of requiring a stepladder and a prayer. The Christmas decorations are accessible without moving eight other boxes. The luggage is on a shelf, not wedged between rafters. The box of baby clothes is in a plastic bin on a plywood deck, not sitting directly on the drywall ceiling of the room below. The attic is doing what it was always meant to do: storing things safely, accessibly, and without threatening to drop someone through the ceiling. The materials cost $300 to $800. The work takes a weekend. The attic has been waiting for this since the house was built.
Last modified: June 20, 2026