Introduction: Why a Proper Roof Inspection Matters
Regular roof inspections are one of the most important and most neglected aspects of home maintenance. A thorough inspection catches small problems before they become major repairs, extends the life of your roof, and protects your home from water damage, mold, and structural deterioration. Yet many homeowners—and even some contractors—make fundamental mistakes when inspecting roofs that lead to missed problems, incorrect diagnoses, and premature roof failures. Understanding what a proper roof inspection entails and knowing the common mistakes to avoid will help you protect one of your home’s most valuable and essential components.
According to the National Roofing Contractors Association (NRCA), roof inspections should be conducted at least twice per year—once in the spring and once in the fall—as well as after any significant storm event. The NRCA emphasizes that a proper inspection is a systematic process that evaluates every component of the roofing system, not just a quick visual scan from the driveway. Following a consistent inspection methodology and avoiding the common mistakes outlined in this guide will help you identify potential issues early and make informed decisions about maintenance, repairs, and replacement.
This guide covers the most frequent roof inspection mistakes, explains why each one compromises the effectiveness of the inspection, and provides practical guidance on how to perform a thorough, accurate roof assessment. Whether you are inspecting your own roof or evaluating the work of a professional inspector, this information will help you ensure that no critical issues are overlooked.
Mistake 1: Only Inspecting from the Ground
The most common roof inspection mistake is relying entirely on a ground-level visual scan. While a ground-level inspection can identify some obvious issues—such as missing shingles, sagging roof lines, or vegetation growing on the roof—it cannot reveal the majority of problems that develop on a roof surface. Damaged flashing around chimneys and vents, lifted shingle edges, cracked rubber boots around plumbing vents, and deteriorating sealant at penetrations are typically invisible from ground level. An inspection that does not include a close-up examination of the roof surface, flashings, and penetrations is incomplete and unreliable.
A proper inspection requires access to the roof surface or, at minimum, a closer view from a ladder at the eaves. If you are not comfortable or able to safely access your roof, hire a professional roofing contractor to perform the inspection. Many contractors offer free or low-cost inspections, and the investment is well worth the peace of mind that comes from knowing your roof has been thoroughly evaluated. For homeowners who do access their roof, using binoculars from a second-story window or from a ladder positioned at the eaves can provide a much better view than a ground-level scan without requiring you to walk on the roof surface.
Mistake 2: Not Inspecting the Attic
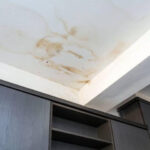
A roof inspection that does not include an attic assessment is missing half the picture. The attic provides critical information about the roof’s condition that is not visible from the exterior. Signs of roof problems that are visible in the attic include water stains on the underside of the roof deck, daylight showing through gaps or holes, wet or compressed insulation, rusted nails or fasteners, mold or mildew growth, and evidence of pests or rodents that have entered through roof damage.
The attic also reveals information about ventilation and insulation conditions that directly affect roof performance. Inspect the attic for proper airflow—feel for a cross-breeze at the soffit and ridge vents, and check for signs of excessive heat buildup, which indicates inadequate ventilation. Look for frost or condensation on the underside of the roof deck in winter, which signals that warm, moist air from the living space is entering the attic and condensing on cold surfaces. Check the insulation for signs of moisture, settling, or rodent damage that could reduce its effectiveness.
When inspecting the attic, use a flashlight and look carefully at the roof deck from inside. Any dark or discolored areas on the wood indicate past or present moisture exposure. Pay particular attention to areas around chimneys, plumbing vents, and exterior walls, where roof leaks most commonly occur. If you find evidence of water intrusion in the attic, mark the location and investigate the corresponding area on the exterior roof surface.
Mistake 3: Ignoring Flashing and Roof Penetrations
Flashing and roof penetrations are the most common sources of roof leaks, yet they are frequently overlooked during inspections. Flashing is installed at every point where the roof surface is interrupted—around chimneys, skylights, plumbing vents, roof vents, attic fans, and at the intersections of roof planes and sidewalls. Because flashing is exposed to weather extremes and thermal stress, it is often the first component of the roofing system to fail. Inspecting flashing requires careful attention to every penetration and intersection on the roof.
Look for rusted, cracked, or corroded metal flashing, gaps or separations between the flashing and the roof surface, deteriorated or missing sealant at flashing edges and seams, and loose or lifted flashing that has pulled away from the roof or wall surface. Pay special attention to the base flashing at chimneys—where the flashing meets the chimney surface—and the counter flashing, which is embedded in the chimney mortar joints. These are frequent leak points that are easy to miss during a quick inspection. On skylights, check the flashing at all four sides and at the top where the flashing meets the roof surface.
Also inspect all roof penetrations, including plumbing vent pipes, exhaust vents, and attic fans. The rubber or neoprene boots around plumbing vents are a common failure point—over time, the rubber dries out, cracks, and loses its seal. If the rubber boot is brittle, cracked, or no longer tightly gripping the pipe, it needs to be replaced. Similarly, check the sealant and metal flashing around exhaust vents and attic fans for signs of deterioration.
Mistake 4: Overlooking Gutters and Downspouts
Many homeowners inspect the roof surface but neglect the gutter system, even though gutters play a critical role in directing water away from the roof and foundation. Clogged, damaged, or improperly sloped gutters can cause water to back up under the roof edge, leading to roof deck rot, fascia damage, and interior leaks. During a roof inspection, gutters should be examined for debris accumulation, which indicates that the gutters are not being cleaned regularly and may be allowing water to overflow against the roof edge and fascia.
Check for signs of rust, corrosion, or separation at gutter seams and joints. Look for gutters that are pulling away from the fascia board, which indicates that the spikes or hangers have loosened over time. Inspect the downspouts to ensure they are securely attached and directing water at least several feet away from the foundation. Check the downspout outlets for blockages that could cause water to back up in the gutter system. Granule accumulation in gutters is also a valuable indicator—excessive granules from asphalt shingles signal that the shingles are deteriorating and nearing the end of their service life.
Mistake 5: Failing to Check for Signs of Poor Ventilation
Roof ventilation problems are a common underlying cause of premature roof failure, but they are often missed during inspections because the signs are subtle or located in the attic. Inadequate ventilation traps heat and moisture in the attic, accelerating the deterioration of roofing materials, promoting mold growth, and contributing to ice dam formation in colder climates. A proper roof inspection should always include an assessment of ventilation adequacy.
Signs of poor ventilation include excessive heat buildup in the attic during summer months, frost or ice buildup on the underside of the roof deck in winter, curling or cupping shingles that are failing prematurely, and high humidity levels in the attic that cause condensation on pipes, ductwork, or the roof deck. Measure the temperature difference between the attic and the outside air on a sunny day—if the attic is significantly hotter than the outside temperature, the ventilation system is not removing heat effectively. Also check that soffit vents are not blocked by insulation or debris, and that ridge vents or exhaust vents are clear and unobstructed.
Mistake 6: Not Inspecting After Major Storms
Many homeowners do not think to inspect their roof after a severe storm unless they see interior water stains. By the time a leak appears inside the home, the roof damage may have been present for months and may have already caused significant deterioration to the underlying structure. Hail, high winds, and falling debris can damage roofing materials without causing immediate leaks—the damage may only become apparent when the next rainstorm tests the compromised area.
The NRCA recommends conducting a roof inspection after any storm event that produces hail of any size, wind speeds exceeding 50 miles per hour, or falling tree limbs or debris. Even if you do not see visible damage from the ground, a closer inspection may reveal hail impacts on shingles, lifted or displaced shingles from wind, dented flashing or gutters, or debris punctures in the roof membrane. Document any storm damage with photographs and contact your insurance company promptly if you suspect damage, as most policies have time limits for filing claims after a storm event.
Mistake 7: Walking on the Roof During Inspection
While accessing the roof surface is necessary for a thorough inspection, walking on the roof without proper care can cause damage that creates new problems. Asphalt shingles become brittle in cold weather and can crack under foot traffic. In hot weather, the shingles are soft and can be dislodged or damaged by pressure. Walking on ridge caps, hips, or the edges of shingles can break seals, loosen granules, or crack the shingle material, creating pathways for water intrusion that did not exist before the inspection.
If you must walk on your roof, wear soft-soled shoes such as sneakers with non-marking soles. Walk only in the valleys or on the lower portion of the shingles, where the risk of damage is lowest. Avoid stepping on ridge caps, hip shingles, and the exposed edges of shingles. Never walk on a roof that is wet, icy, or covered with debris. For homeowners who are not comfortable walking on their roof, a professional inspection is the safer and more effective alternative. Professional roofers have safety equipment, experience navigating roof surfaces, and the knowledge to conduct a thorough inspection without causing damage.
Mistake 8: Confusing Normal Wear with Storm Damage
Distinguishing between normal age-related deterioration and storm damage requires experience and knowledge of roofing materials. Homeowners who are not familiar with the typical aging patterns of roofing materials may mistake normal wear for storm damage or, conversely, may dismiss genuine storm damage as normal aging. Both mistakes have consequences: misidentifying normal wear as storm damage can lead to unnecessary repairs or insurance claims, while failing to recognize storm damage can delay necessary repairs and allow water intrusion to occur.
Normal wear signs include gradual granule loss, minor curling at the edges of aging shingles, and small blisters on the shingle surface. Storm damage signs include randomly distributed hail impacts (visible as dark, bruise-like spots on shingles), lifted or missing shingles from wind, clean dents on metal components, and fresh damage concentrated on one slope of the roof. If you are uncertain about whether damage is storm-related or age-related, consult a professional roofing contractor or a licensed insurance adjuster who can provide an expert assessment.
Mistake 9: Not Documenting Findings
A roof inspection is only useful if the findings are recorded and tracked over time. Homeowners who inspect their roof but do not document what they find lose the ability to track changes in the roof’s condition, identify developing problems, and provide documentation for insurance claims or contractor discussions. A simple inspection log with dates, observed conditions, photographs, and notes about any repairs or maintenance performed can be invaluable for making informed decisions about roof care and replacement planning.
Take photographs of every area you inspect, including the overall roof surface, flashings, penetrations, gutters, and any areas of concern. Capture close-up images of damaged areas with a reference object for scale. Store these photographs with your inspection notes in a digital folder or physical file. When you conduct your next inspection, review the previous photographs to assess whether conditions have changed, worsened, or remained stable. This documentation is also essential for substantiating insurance claims and provides a clear record for contractors who are evaluating your roof for repairs or replacement.
Mistake 10: Skipping Professional Inspections
While regular DIY inspections are valuable for catching obvious issues, they are not a substitute for professional inspections by a qualified roofing contractor. Professional roofers have the training, experience, and equipment to identify subtle problems that an untrained eye will miss. They can safely access all areas of the roof, including steep slopes and hazardous sections. They are familiar with the specific failure modes of different roofing materials and can distinguish between issues that require immediate attention and those that can be monitored over time.
The NRCA recommends that homeowners schedule a professional roof inspection at least once per year, in addition to their own seasonal visual checks. A professional inspection typically costs $150 to $400, depending on the size and complexity of the roof. Many roofing contractors offer free inspections with the expectation that they will be hired for any necessary repairs, but these inspections may be less thorough than a paid inspection from an independent professional. For the most objective assessment, consider hiring an inspector who specializes in roof evaluations and does not perform installation or repair work.
How to Conduct a Proper Roof Inspection
A proper roof inspection follows a systematic sequence that covers every component of the roofing system. Begin with a ground-level inspection, walking around the entire perimeter of the house and examining the roof from all angles with binoculars. Look for sagging areas, missing or damaged shingles, lifted edges, and condition of flashings visible from below. Next, inspect the attic thoroughly, using a flashlight to examine the roof deck for stains, daylight, and signs of moisture. Check the insulation condition and ventilation airflow.
If you safely can, access the roof surface for a close-up examination. Start at the ridge and work downward, inspecting each course of shingles or roofing material. Pay particular attention to flashings around all penetrations, valleys where roof planes intersect, and the edges of the roof at the eaves and rake. Inspect the gutters for debris, granules, and signs of overflow damage. Document all findings with photographs and notes. Compare your findings with previous inspection records to identify changes over time. Finally, create a prioritized list of any issues discovered, distinguishing between items that require immediate attention and those that can be scheduled for future maintenance.
Conclusion
Conducting thorough and accurate roof inspections is one of the most effective ways to extend the life of your roof and protect your home from water damage. By avoiding common inspection mistakes—relying only on ground-level views, skipping the attic, ignoring flashings and penetrations, neglecting gutters, failing to check ventilation, and not documenting findings—you can develop a complete understanding of your roof’s condition and address problems before they escalate.
Combine regular DIY inspections with annual professional assessments to ensure that no issues are overlooked. Follow the NRCA’s recommendation of inspecting at least twice per year and after any major storm event. Keep detailed records of each inspection, including photographs, to track changes over time and provide documentation for insurance and contractor discussions. A disciplined approach to roof inspection is a small investment of time that pays enormous dividends in extended roof life, avoided emergency repairs, and the peace of mind that comes from knowing your home is well protected.
Last modified: July 23, 2026