The toilet runs for ten seconds after every flush, or it runs constantly, or the handle has to be jiggled in a specific way that only you have mastered, or the flush is so weak that a single piece of tissue survives the cycle. All of these problems originate inside the tank, and all of them are fixed by replacing one of three inexpensive components: the flapper, the flush valve, or the fill valve. Replacing the entire flush mechanism, the flapper, the flush valve, and the fill valve together, costs about forty dollars in parts and takes about an hour. It requires no pipe cutting, no glue, and no tools beyond an adjustable wrench and a screwdriver. The toilet is the simplest plumbing fixture in the house, and the flush mechanism is the simplest part of the toilet.
A toilet flush is a chain reaction, literally. You push the handle, which lifts a chain, which lifts the flapper, which opens the flush valve, which releases the water in the tank into the bowl through the force of gravity, which creates a siphon in the trap, which pulls the waste out of the bowl and down the drain. The fill valve then refills the tank and the bowl to the correct levels and shuts off. Any break in this chain produces a toilet that does not flush properly, and replacing the broken link is usually faster than diagnosing which specific link is broken.
Diagnose the Problem Before You Buy Any Parts
A toilet that runs constantly, with water trickling from the tank into the bowl between flushes, has a leaking flapper or a cracked flush valve seat. Add a few drops of food coloring to the tank water and wait fifteen minutes without flushing. If colored water appears in the bowl, the flapper is not sealing. Replace the flapper. If replacing the flapper does not stop the leak, the flush valve seat, the plastic ring that the flapper seals against, is cracked or warped. The flush valve must be replaced, which requires removing the tank from the bowl.
A toilet that runs intermittently, cycling on for a few seconds at random times, has a slow leak at the flapper or a fill valve that is failing to shut off completely. The water level slowly drops until the fill valve activates to top it off. A toilet that makes a hissing sound constantly has a fill valve that is stuck open or a float that is set too high, allowing water to spill into the overflow tube. A toilet with a weak flush, where the water swirls but does not clear the bowl, has a clogged rim jet or siphon jet, the small holes under the rim and at the bottom of the bowl that direct water into the trap. Clean the jets with a piece of wire and a mirror. A toilet where the handle must be held down for the entire flush has a chain that is too long or a flapper that closes too quickly. Shorten the chain or replace the flapper with an adjustable model.
Replacing the Flapper — Five Minutes, Five Dollars, Fixes Most Problems
Shut off the water at the valve behind the toilet. Flush to drain the tank. The flapper is the rubber or plastic disk at the bottom center of the tank, connected to the flush handle by a chain. Unhook the chain from the handle. Unhook the flapper arms from the ears on the sides of the flush valve tube, the vertical plastic pipe in the center of the tank. Lift the old flapper out.
Take the old flapper to the hardware store and match it. Flappers are not universal. A two-inch flapper will not seal a three-inch flush valve opening. Some toilets use a proprietary flapper that must be purchased from the manufacturer. A universal flapper that claims to fit all toilets fits most toilets and leaks on the rest. Match the size and the attachment style. If the flush valve has ears that the flapper arms hook onto, buy a flapper with arms. If the flush valve has a ring that the flapper slides over, buy a flapper that slides.
Install the new flapper by hooking the arms onto the ears or sliding it over the flush valve tube. Attach the chain to the flush handle lever with about half an inch of slack. When the flapper is closed and the handle is at rest, the chain should have a slight droop but not so much that it can catch under the flapper. Too much slack and the handle must be pushed all the way down before the flapper lifts. Too little slack and the flapper will not close completely because the chain is holding it open. Adjust the chain length by hooking it to a different hole in the handle lever or by trimming the chain with wire cutters. Turn the water back on, let the tank fill, and flush. If the flapper closes completely and the tank refills without running, the job is done.
Replacing the Flush Valve — When the Flapper Did Not Fix It
If a new flapper does not stop the leak, the flush valve itself is the problem. The flush valve is the vertical tube in the center of the tank that the flapper seals against. Replacing it requires removing the tank from the bowl, which is the same procedure as removing the tank for a tank replacement, except you are reusing the same tank and only replacing the internal components.
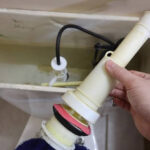
Shut off the water and drain the tank. Disconnect the supply line. Remove the tank bolts. Lift the tank off the bowl and set it on a towel on the floor. The large lock nut on the bottom of the tank holds the flush valve in place. Unscrew it by hand or with a large pair of pliers. Lift the old flush valve out of the tank. Clean the opening in the bottom of the tank where the flush valve sat, removing any old gasket material.
Install the new flush valve by inserting it through the opening from inside the tank, seating the gasket on the inside of the tank, not the outside. The gasket seals the opening from the inside where the water pressure pushes it against the porcelain. Tighten the lock nut from underneath by hand, then an additional quarter turn with pliers. Do not overtighten. The gasket seals by compression, not by crushing. Reinstall the tank on the bowl with a new tank-to-bowl gasket, reconnect the supply line, and install the new flapper that came with the flush valve. Fill the tank and check for leaks at the tank-to-bowl connection and the flush valve opening.
Replacing the Fill Valve — Ten Minutes While the Tank Is Already Open
If the tank is off the bowl to replace the flush valve, replace the fill valve at the same time. A fill valve costs fifteen dollars, and replacing it while the tank is already off takes ten minutes. Replacing it later, after the tank is reinstalled and the toilet is back in service, means working in the cramped space inside the tank with the tank still on the bowl. The fill valve is the vertical assembly on the left side of the tank with the float attached to it.
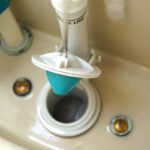
Shut off the water, drain the tank, and disconnect the supply line from the bottom of the fill valve. Unscrew the lock nut that holds the fill valve to the bottom of the tank and lift the old fill valve out. Insert the new fill valve through the opening, adjust its height so the top of the valve is above the top of the overflow tube, and tighten the lock nut. Connect the small plastic tube from the fill valve to the top of the overflow tube and secure it with the provided clip. This tube refills the bowl after each flush, and without it, the bowl water level will be too low to create a proper siphon on the next flush. Adjust the float height so the water stops about half an inch below the top of the overflow tube, and turn the water back on.
FAQ — Replacing a Toilet Flush
How do I know whether to replace just the flapper or the whole flush valve?
Replace the flapper first. It costs five dollars and takes five minutes. If the toilet stops running, the flapper was the problem. If the toilet still runs after a new flapper, run your finger around the flush valve seat, the ring the flapper rests on. If the seat feels rough, pitted, or uneven, the flush valve needs to be replaced. Also replace the flush valve if the toilet is more than twenty years old and the flush valve is original. The plastic degrades over time, and a new flapper cannot seal against a seat that is no longer smooth and round.
Should I replace all the internal parts at once or only the broken one?
If the toilet is more than ten years old and you are already removing the tank to replace the flush valve, replace the flapper, the flush valve, the fill valve, and the tank-to-bowl gasket all at once. A complete internal rebuild kit costs about thirty to forty dollars and replaces every component that can fail. The incremental cost of replacing the fill valve and the gasket when the tank is already off is about fifteen dollars in parts and ten minutes of work. Replacing them later, when the fill valve fails two years from now, costs the same fifteen dollars in parts and requires working inside a cramped tank that is still attached to the bowl. The labor savings alone justify replacing everything while the tank is off.
Are toilet flush parts universal, or do I need to match the brand?
Flappers are brand-specific for some toilets and universal for others. Kohler and Toto toilets often use proprietary flush valves and flappers that must be purchased from the manufacturer or from a plumbing supply house that stocks OEM parts. American Standard and most generic toilets use standard two-inch or three-inch flush valves that accept universal flappers. If you do not know the brand, take the old flapper to the store and match it visually. Fill valves are almost entirely universal. A standard Fluidmaster fill valve fits virtually every toilet made in the last forty years.
Last modified: June 18, 2026